
Installation Guide
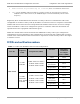


Table Of Contents
- PMP 450i and PTP 450i Configuration and User Guide
- Safety and regulatory information
- Contents
- List of Figures
- List of Tables
- About This Configuration and User Guide
- Chapter 1: Reference information
- Chapter 2: Configuration
- Preparing for configuration
- Task 1: Connecting to the unit
- Task 2: Configuring IP and Ethernet interfaces
- Configuring the AP IP interface
- NAT, DHCP Server, DHCP Client and DMZ in SM
- Configuring the SM IP interface with NAT disabled
- Configuring the SM IP interface with NAT enabled
- NAT tab of the SM with NAT disabled
- NAT tab of the SM with NAT enabled
- Reconnecting to the management PC
- VLAN Remarking and Priority bits configuration
- VLAN tab of the AP
- VLAN tab of the SM
- VLAN Membership tab of the SM
- PPPoE tab of the SM
- NAT Port Mapping tab of the SM
- Task 3: Upgrading the software version and using CNUT
- Task 4: Configuring General and Unit settings
- Task 5: Configuring security
- Isolating APs from the internet
- Encrypting radio transmissions
- Managing module access by passwords
- Requiring SM Authentication
- Filtering protocols and ports
- Encrypting downlink broadcasts
- Isolating SMs
- Filtering management through Ethernet
- Allowing management only from specified IP addresses
- Configuring management IP by DHCP
- Restricting radio Telnet access over the RF interface
- Security tab of the AP
- Filtering protocols and ports
- Protocol Filtering tab of the AP
- Port configuration tab of the AP
- Security tab of the SM
- Protocol Filtering tab of the SM
- Port Configuration tab of the SM
- Task 6: Configuring radio parameters
- Task 7: Setting up SNMP agent
- Task 8: Configuring syslog
- Task 9: Configuring remote access
- Task 10: Monitoring the AP-SM Link
- Task 11: Configuring quality of service
- Maximum Information Rate (MIR) Parameters
- Token Bucket Algorithm
- MIR Data Entry Checking
- Committed Information Rate (CIR)
- Bandwidth from the SM Perspective
- Interaction of Burst Allocation and Sustained Data Rate Settings
- High-priority Bandwidth
- Traffic Scheduling
- Setting the Configuration Source
- Quality of Service (QoS) tab of the AP
- DiffServ tab of the AP
- Quality of Service (QoS) tab of the SM
- DiffServ tab of the SM
- Task 12: Performing an Sector Wide SA
- Task 13: Zero Touch Configuration Using DHCP Option 66
- Task 14: Configuring Radio via config file
- Task 15: Configuring a RADIUS server
- Understanding RADIUS for PMP 450i
- Choosing Authentication Mode and Configuring for Authentication Servers - AP
- SM Authentication Mode – Require RADIUS or Follow AP
- Handling Certificates
- Configuring your RADIUS servers for SM authentication
- Assigning SM management IP addressing via RADIUS
- Configuring your RADIUS server for SM configuration
- Using RADIUS for centralized AP and SM user name and password management
- RADIUS Device Data Accounting
- RADIUS Device Re-authentication

Compliance with radio regulations PMP 450i and PTP 450i Configuration and User
Guide
Table 6 OFDM DFS operation based on Country Code setting
Country
Code
Band AP SM Weather Radar
Notch-Out
United
States
4.9-GHz No effect No effect No
5.8-GHz No effect No effect No
After an AP with DFS is powered on it performs a channel availability check on its main carrier
frequency for 1 minute, monitoring for the radar signature without transmitting. If no radar
signature is detected during this minute, the module then proceeds to normal beacon transmit
mode. If it does detect a radar signature, the frequency is marked for a 30 minute non-occupancy
period, and the module moves to its 1
st
alternate carrier frequency. The AP continues this
behavior through its 2nd alternate frequency if needed and then waits until the first frequency
ends the 30 minute non-occupancy period. While operating, if the AP detects a weather radar
signature it marks the current carrier frequency for a 30 minute non-occupancy period and moves
to check the next-in-line carrier frequency.
An SM does not begin transmission until it detects a beacon from an AP. If APs are not
transmitting, SMs will be silent.
Europe applies the ETSI specification to both APs and SMs, while Brazil applies it only to APs. In
the ETSI case, when an SM is powered on, it scans to find a Canopy beacon from a AP. If an AP is
found, the SM performs a channel availability check on that frequency for 1 minute, monitoring
for the radar signature, without transmitting. A DFS decision is made based on the following:
• If no radar pulse is detected during this 1 minute, the SM proceeds through normal steps to
register to an AP.
• If the SM does detect radar, it locks out that frequency for 30 minutes and continues
scanning other frequencies in its scan list.
After an SM with DFS has seen a radar signature on a frequency and locked out that frequency, it
may connect to a different AP if color codes, AP transmitting frequencies, and SM scanned
frequencies support that connection.
To simplify operation and ensure compliance, an SM takes on the DFS type of the AP to which it
registers. For example, when an SM in Europe registers to an AP with the Country Code set to
“United Kingdom”, that SM will use ETSI DFS, no matter what its Country Code is set to, even if
its Country Code is set to “None”. Note, the operator should still configure the Country Code in
the SM correctly, as future releases may use the Country Code for additional region-specific
options.
For all modules running DFS, the module displays its DFS state on its Home => General Status
page as one of the following:
• Checking Channel Availability Remaining time n seconds,
where n counts down from
60 to 1.
• Normal Transmit
pmp-0957 (April 2015) 9