
Installation Guide


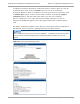
Table Of Contents
- PMP 450i and PTP 450i Configuration and User Guide
- Safety and regulatory information
- Contents
- List of Figures
- List of Tables
- About This Configuration and User Guide
- Chapter 1: Reference information
- Chapter 2: Configuration
- Preparing for configuration
- Task 1: Connecting to the unit
- Task 2: Configuring IP and Ethernet interfaces
- Configuring the AP IP interface
- NAT, DHCP Server, DHCP Client and DMZ in SM
- Configuring the SM IP interface with NAT disabled
- Configuring the SM IP interface with NAT enabled
- NAT tab of the SM with NAT disabled
- NAT tab of the SM with NAT enabled
- Reconnecting to the management PC
- VLAN Remarking and Priority bits configuration
- VLAN tab of the AP
- VLAN tab of the SM
- VLAN Membership tab of the SM
- PPPoE tab of the SM
- NAT Port Mapping tab of the SM
- Task 3: Upgrading the software version and using CNUT
- Task 4: Configuring General and Unit settings
- Task 5: Configuring security
- Isolating APs from the internet
- Encrypting radio transmissions
- Managing module access by passwords
- Requiring SM Authentication
- Filtering protocols and ports
- Encrypting downlink broadcasts
- Isolating SMs
- Filtering management through Ethernet
- Allowing management only from specified IP addresses
- Configuring management IP by DHCP
- Restricting radio Telnet access over the RF interface
- Security tab of the AP
- Filtering protocols and ports
- Protocol Filtering tab of the AP
- Port configuration tab of the AP
- Security tab of the SM
- Protocol Filtering tab of the SM
- Port Configuration tab of the SM
- Task 6: Configuring radio parameters
- Task 7: Setting up SNMP agent
- Task 8: Configuring syslog
- Task 9: Configuring remote access
- Task 10: Monitoring the AP-SM Link
- Task 11: Configuring quality of service
- Maximum Information Rate (MIR) Parameters
- Token Bucket Algorithm
- MIR Data Entry Checking
- Committed Information Rate (CIR)
- Bandwidth from the SM Perspective
- Interaction of Burst Allocation and Sustained Data Rate Settings
- High-priority Bandwidth
- Traffic Scheduling
- Setting the Configuration Source
- Quality of Service (QoS) tab of the AP
- DiffServ tab of the AP
- Quality of Service (QoS) tab of the SM
- DiffServ tab of the SM
- Task 12: Performing an Sector Wide SA
- Task 13: Zero Touch Configuration Using DHCP Option 66
- Task 14: Configuring Radio via config file
- Task 15: Configuring a RADIUS server
- Understanding RADIUS for PMP 450i
- Choosing Authentication Mode and Configuring for Authentication Servers - AP
- SM Authentication Mode – Require RADIUS or Follow AP
- Handling Certificates
- Configuring your RADIUS servers for SM authentication
- Assigning SM management IP addressing via RADIUS
- Configuring your RADIUS server for SM configuration
- Using RADIUS for centralized AP and SM user name and password management
- RADIUS Device Data Accounting
- RADIUS Device Re-authentication

Task 15: Configuring a RADIUS server PMP 450i and PTP 450i Configuration and User
Guide
SM - Phase 1 (Outside Identity) parameters and
settings
The protocols supported for the Phase 1 (Outside Identity) phase of authentication
are
eapttls (Extensible Authentication Protocol Tunneled Transport Layer
Security) and
eapMSChapV2
(Extensible Authentication Protocol – Microsoft Challenge-Handshake
Authentication Protocol).
Configure an outer Identity in the Username field. This must match the Phase
1/Outer
Identity username configured in the RADIUS server. The default Phase 1/Outer
Identity
Username is “anonymous”. The Username can be up to 128 non-special (no
diacritical
markings) alphanumeric
characters.
If Realms are being used in the RADIUS system
(eapttls only), select Enable Realm and configure an outer identity in the
Identity
field and
a Realm in the Realm field. These must match the Phase 1/Out
er Identity and
Realm
configured in the RADIUS server. The default Identity is “anonymous”. The Identity can be
up
to
128 non-special (no diacritical markings) alphanumeric characters. The default Realm
is
“canopy.net”. The Realm can also be up to 128 non-special alphanumeric
characters.
SM - Phase 2 (Inside Identity) parameters and
settings
If using eapttls for Phase 1 authentication, select the desired Phase 2 (Inside Identity)
authentication protocol from the Phase 2 options of PAP (Password Authentication
Protocol), CHAP (Challenge Handshake
Authentication
Protocol), and MSCHAPv2
(Microsoft’s version of CHAP). The protocol
must
be
consistent with the authentication
protocol configured on the RADIUS
server.
Enter a Username for the SM. This must
match the username configured for the SM on
the
RADIUS server. The default
Username is the SM’s MAC address.
The Username can be up
to
128 non-special (no
diacritical markings) alphanumeric
characters.
Enter the desired password for the SM in the Password and Confirm Password fields.
The
Password must match the password configured for the SM on the RADIUS server.
The
default Password is “password”. The Password can be up to 128 non-special (no
diacritical
markings) alphanumeric
characters.
Handling Certificates
Managing SM Certificates via the SM GUI
The default public Canopy certificates are loaded into SMs upon factory software
installation. The default certificates are not secure and are intended for
use
during lab and field trials as part of gaining experience with the RADIUS
functionalities or as
an
option during debug. For secure operation, an operator will
want to create or procure their
own
certificates. Resetting a SM to its factory
defaults will remove the current certificates and restore the default certificates.
Up to two certificates can be resident on a SM. An installed certificate can be
deleted
by
clicking the Delete button in the certificate’s description block on the
Configuration >
Security
tab. To restore fhe 2 default certificates, click the Use
Default Certificates button in
the
RADIUS Certificate Settings parameter
block and reboot the
radio.
pmp-0957 (April 2015) 197