
Installation Guide
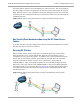
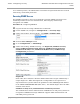
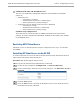
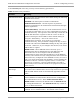
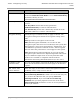
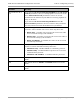


Table Of Contents
- PMP 450i and PTP 450i Configuration and User Guide
- Safety and regulatory information
- Contents
- List of Figures
- List of Tables
- About This Configuration and User Guide
- Chapter 1: Reference information
- Chapter 2: Configuration
- Preparing for configuration
- Task 1: Connecting to the unit
- Task 2: Configuring IP and Ethernet interfaces
- Configuring the AP IP interface
- NAT, DHCP Server, DHCP Client and DMZ in SM
- Configuring the SM IP interface with NAT disabled
- Configuring the SM IP interface with NAT enabled
- NAT tab of the SM with NAT disabled
- NAT tab of the SM with NAT enabled
- Reconnecting to the management PC
- VLAN Remarking and Priority bits configuration
- VLAN tab of the AP
- VLAN tab of the SM
- VLAN Membership tab of the SM
- PPPoE tab of the SM
- NAT Port Mapping tab of the SM
- Task 3: Upgrading the software version and using CNUT
- Task 4: Configuring General and Unit settings
- Task 5: Configuring security
- Isolating APs from the internet
- Encrypting radio transmissions
- Managing module access by passwords
- Requiring SM Authentication
- Filtering protocols and ports
- Encrypting downlink broadcasts
- Isolating SMs
- Filtering management through Ethernet
- Allowing management only from specified IP addresses
- Configuring management IP by DHCP
- Restricting radio Telnet access over the RF interface
- Security tab of the AP
- Filtering protocols and ports
- Protocol Filtering tab of the AP
- Port configuration tab of the AP
- Security tab of the SM
- Protocol Filtering tab of the SM
- Port Configuration tab of the SM
- Task 6: Configuring radio parameters
- Task 7: Setting up SNMP agent
- Task 8: Configuring syslog
- Task 9: Configuring remote access
- Task 10: Monitoring the AP-SM Link
- Task 11: Configuring quality of service
- Maximum Information Rate (MIR) Parameters
- Token Bucket Algorithm
- MIR Data Entry Checking
- Committed Information Rate (CIR)
- Bandwidth from the SM Perspective
- Interaction of Burst Allocation and Sustained Data Rate Settings
- High-priority Bandwidth
- Traffic Scheduling
- Setting the Configuration Source
- Quality of Service (QoS) tab of the AP
- DiffServ tab of the AP
- Quality of Service (QoS) tab of the SM
- DiffServ tab of the SM
- Task 12: Performing an Sector Wide SA
- Task 13: Zero Touch Configuration Using DHCP Option 66
- Task 14: Configuring Radio via config file
- Task 15: Configuring a RADIUS server
- Understanding RADIUS for PMP 450i
- Choosing Authentication Mode and Configuring for Authentication Servers - AP
- SM Authentication Mode – Require RADIUS or Follow AP
- Handling Certificates
- Configuring your RADIUS servers for SM authentication
- Assigning SM management IP addressing via RADIUS
- Configuring your RADIUS server for SM configuration
- Using RADIUS for centralized AP and SM user name and password management
- RADIUS Device Data Accounting
- RADIUS Device Re-authentication

Task 5: Configuring security PMP 450i and PTP 450i Configuration and User
Guide
• IP Access Filtering Disabled, then management access is allowed from any IP
address, even if the Allowed Source IP
1 to 3
parameters are populated.
• IP Access Filtering Enabled, and specify at least one address in the Allowed
Source IP
1 to 3
parameter, then management access is limited to the specified
address(s). If you intend to use Wireless Manager to manage the element, then you
must ensure that the IP address of the Wireless Manager server is listed here.
Configuring management IP by DHCP
The IP tab in the Configuration web page of every radio contains a LAN1 Network
Interface Configuration, DHCP State parameter that, if enabled, causes the IP
configuration (IP address, subnet mask, and gateway IP address) to be obtained
through DHCP instead of the values of those individual parameters. The setting of
this DHCP state parameter is also viewable, but is not settable, in the Network
Interface tab of the Home page.
In the SM, this parameter is settable
• in the NAT tab of the Configuration web page, but only if NAT is enabled.
• in the IP tab of the Configuration web page, but only if the Network Accessibility
parameter in the IP tab is set to Public.
Restricting radio Telnet access over the RF interface
RF Telnet Access restricts Telnet access to the AP from a device situated below a
network SM (downstream from the AP). This is a security enhancement to restrict
RF-interface sourced AP access specifically to the LAN1 IP address and LAN2 IP
address (Radio Private Address, typically 192.168.101.[LUID]). This restriction
disallows unauthorized users from running Telnet commands on the AP that can
change AP configuration or modifying network-critical components such as routing
and ARP tables.
The RF Telnet Access may be configured via the AP GUI or via SNMP commands,
and RF Telnet Access is set to “Enabled” by default. Once RF Telnet Access is set to
“Disabled”, if there is a Telnet session attempt to the AP originating from a device
situated below the SM (or any downstream device), the attempt is dropped. This
also includes Telnet session attempts originated from the SM’s management
interface (if a user has initiated a Telnet session to a SM and attempts to Telnet
from the SM to the AP). In addition, if there are any active Telnet connections to
the AP originating from a device situated below the SM (or any downstream device),
the connection is dropped. This behavior must be considered if system
administrators use Telnet downstream from an AP (from a registered SM) to modify
system parameters.
Setting RF Telnet Access to “Disabled” does not affect devices situated above the AP
from accessing the AP via Telnet, including servers running the CNUT (Canopy
Network Updater tool) application. Also, setting RF Telnet Access to “Disabled”
does not affect any Telnet access into upstream devices (situated above or adjacent
to the AP) through the AP (see Figure 32).
pmp-0957 (April 2015) 89