
Installation Guide
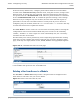
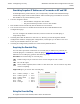


Table Of Contents
- PMP 450i and PTP 450i Configuration and User Guide
- Safety and regulatory information
- Contents
- List of Figures
- List of Tables
- About This Configuration and User Guide
- Chapter 1: Reference information
- Chapter 2: Configuration
- Preparing for configuration
- Task 1: Connecting to the unit
- Task 2: Configuring IP and Ethernet interfaces
- Configuring the AP IP interface
- NAT, DHCP Server, DHCP Client and DMZ in SM
- Configuring the SM IP interface with NAT disabled
- Configuring the SM IP interface with NAT enabled
- NAT tab of the SM with NAT disabled
- NAT tab of the SM with NAT enabled
- Reconnecting to the management PC
- VLAN Remarking and Priority bits configuration
- VLAN tab of the AP
- VLAN tab of the SM
- VLAN Membership tab of the SM
- PPPoE tab of the SM
- NAT Port Mapping tab of the SM
- Task 3: Upgrading the software version and using CNUT
- Task 4: Configuring General and Unit settings
- Task 5: Configuring security
- Isolating APs from the internet
- Encrypting radio transmissions
- Managing module access by passwords
- Requiring SM Authentication
- Filtering protocols and ports
- Encrypting downlink broadcasts
- Isolating SMs
- Filtering management through Ethernet
- Allowing management only from specified IP addresses
- Configuring management IP by DHCP
- Restricting radio Telnet access over the RF interface
- Security tab of the AP
- Filtering protocols and ports
- Protocol Filtering tab of the AP
- Port configuration tab of the AP
- Security tab of the SM
- Protocol Filtering tab of the SM
- Port Configuration tab of the SM
- Task 6: Configuring radio parameters
- Task 7: Setting up SNMP agent
- Task 8: Configuring syslog
- Task 9: Configuring remote access
- Task 10: Monitoring the AP-SM Link
- Task 11: Configuring quality of service
- Maximum Information Rate (MIR) Parameters
- Token Bucket Algorithm
- MIR Data Entry Checking
- Committed Information Rate (CIR)
- Bandwidth from the SM Perspective
- Interaction of Burst Allocation and Sustained Data Rate Settings
- High-priority Bandwidth
- Traffic Scheduling
- Setting the Configuration Source
- Quality of Service (QoS) tab of the AP
- DiffServ tab of the AP
- Quality of Service (QoS) tab of the SM
- DiffServ tab of the SM
- Task 12: Performing an Sector Wide SA
- Task 13: Zero Touch Configuration Using DHCP Option 66
- Task 14: Configuring Radio via config file
- Task 15: Configuring a RADIUS server
- Understanding RADIUS for PMP 450i
- Choosing Authentication Mode and Configuring for Authentication Servers - AP
- SM Authentication Mode – Require RADIUS or Follow AP
- Handling Certificates
- Configuring your RADIUS servers for SM authentication
- Assigning SM management IP addressing via RADIUS
- Configuring your RADIUS server for SM configuration
- Using RADIUS for centralized AP and SM user name and password management
- RADIUS Device Data Accounting
- RADIUS Device Re-authentication

Task 5: Configuring security PMP 450i and PTP 450i Configuration and User
Guide
Overriding Forgotten IP Addresses or Passwords on AP and SM
A small adjunctive product allows you to temporarily override some AP/SM settings
and thereby regain control of the module. This override plug is needed for access to
the module in any of the following cases:
• You have forgotten either
o the IP address assigned to the module.
o the password that provides access to the module.
• The module has been locked by the No Remote Access feature.
• You want local access to a module that has had the 802.3 link disabled in the
Configuration page.
You can configure the module such that, when it senses the override plug, it
responds by either
• resetting the LAN1 IP address to 169.254.1.1, allowing access through the default
configuration without
changing
the configuration, whereupon you is able to view and
reset any non-default values as you wish.
• resetting all configurable parameters to their factory default values.
Acquiring the Override Plug
You can either purchase or fabricate an override plug as follows. To purchase an
override plug for a nominal fee, order the plug at http://www.best-tronics.com
. To
fabricate an override plug, perform the following steps.
Procedure 7 Constructing an override plug
1
Install an RJ-11 6-pin connector onto a 6-inch length of CAT 5 cable
2
Pin out all 6-pins.
3
Short (solder together) Pins 4 and 6 on the other end. Do not connect any other
wires to anything.
Figure 30 RJ-11 pin out for the override plug
Pin
1 → white / orange ← Pin 1
Pin 2 → white / green ← Pin 2
Pin 3 → white / blue ← Pin 3
Pin 4 → green ← Pin 6
Pin 5 → blue ← Pin 5
Pin 6 → orange ← Pin 4
Using the Override Plug
To regain access to the module, follow these instructions:
pmp-0957 (April 2015) 83