COOL TOUCH COUNTERTOP OVEN INSTRUCTION MANUAL MODEL: TSCLTVCT2 P.N.
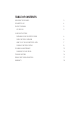
TABLE OF CONTENTS IMPORTANT SAFEGUARDS 3 POLARIZED PLUG 4 PRODUCT DIAGRAM 5 LCD DISPLAY 5 USAGE INSTRUCTIONS PREPARING YOUR COUNTERTOP OVEN 6 OVEN FUNCTIONS OVERVIEW 6 HOW TO USE YOUR COUNTERTOP OVEN 7 COOKING FUNCTIONS DETAILS 8 CLEANING & MAINTENANCE CHANGING THE LIGHTBULB 15 16 TROUBLESHOOTING 16 ERROR CODE TROUBLESHOOTING 17 WARRANTY 18
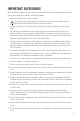
IMPORTANT SAFEGUARDS When using electrical appliances, basic safety precautions should always be followed to reduce the risk of fire, electric shock, and/or injury to persons including the following: 1. Read all instructions before using this product. 2. This appliance generates heat during use. Do not touch hot surfaces. Use handles or knobs. Always protect your hands with non-slip oven mitts or similar. 3.
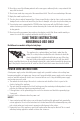
18. Do not place any of the following materials in the oven: paper, cardboard, plastic, or any materials that may catch fire or melt. 19. Do not cover crumb tray or any part of the oven with metal foil. This will cause overheating of the oven. 20. Empty the crumb tray after each use. 21. The glass door is made of tempered glass. Always inspect the glass door for chips, cracks or any other damage. Do not use the toaster oven if the glass door is damaged, as the glass may shatter during use. 22.
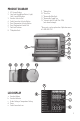
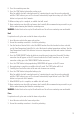
PRODUCT DIAGRAM 9. *Baking Pan 10. *Pizza Pan 11. *Removable Wire Rack 12. *Removable Crumb Tray 13. *Interior Light (G9 bulb 25w 120v) (not shown in image) 1. LCD Screen Display 2. Step Cook, Keep Warm, Defrost, Light, Start, Cancel/Off Buttons 3. Function Selector Dial 4. Turbo Convection Selector Button 5. Time/ Temperature Selector Button 6. Time/ Temperature Control Dial 7. Two Rack Positions 8. *Dehydrate Rack *These parts can be replaced on Calphalon.
PREPARING YOUR COUNTERTOP OVEN • Remove all packaging before using the Calphalon® Cool Touch Countertop Oven. • Wipe Countertop Oven with a damp cloth. DO NOT IMMERSE IN WATER. Make sure to only use mild, soapy water. Abrasive cleaners, scrubbing brushes and chemical cleaners will damage the coating on this unit. Dry the unit thoroughly before using. NOTE: Do not immerse the cord, plug or body of the unit in water. • Clean accessories.
HOW TO USE YOUR COUNTERTOP OVEN • Once the Calphalon® Cool Touch Countertop Oven is plugged in, the LCD screen will illuminate and the START Button LED light will flash. • The Function Options will be displayed on the LCD Screen with the Function Indicator on the default preset TOAST function. • Turn the Function Selector Dial to select one of the following 10 options: Toast (Default), Bagel, Bake, Roast, Broil, Proof, Pizza, Cookies, Reheat, And Dehydrate.
• The LCD screen light will turn off after 90 seconds of inactivity. Press any button to wake up the appliance. • Press the Cancel/OFF Button to turn off the Countertop Oven. 1. Keep oven door closed during and after cooking cycle once food has been removed. Note that the temperature on the top of the oven will rise whenever the door is open due to heat escape. 2. The cooling fan will run for a variable amount of time following a cooking cycle even though the oven is not on.
Bake For optimal results, place wire rack in the lower rack position. 1. Insert the wire rack into the lower rack position. Note that certain baked goods call for upper rack placement. 2. Ensure the countertop oven door is closed for preheating. 3. Turn the Function Selector Dial to select the BAKE function. Once the function has been selected, use the Time/Temperature Control Dial to select the desired cooking temperature and time.
8. Close the countertop oven door. 9. Press the START button to begin the roasting cycle. Note: An audible alert will sound and repeat in 1-minute intervals once the oven has preheated until the START button is pressed. The oven will automatically begin the roasting cycle if the START button is not pressed after 5 minutes. 10. When roasting cycle is complete, an audible alert will sound. 11. Open countertop oven door fully and remove food carefully.
3. Turn the Function Selector Dial to select the PIZZA function. Once the function has been selected, use the Time/Temperature Control Dial to select the desired cooking temperature and time. Turn the Time/Temperature Control Dial clockwise to increase temperature and time and counter-clockwise to decrease. 4. Press the TURBO CONVECT button for better air circulation and crispier food if needed. The turbo convection fan will appear on the LCD screen to indicate that Turbo Convection is on.
10. When cooking cycle is complete, an audible alert will sound. 11. Open countertop oven door fully and remove food carefully. We recommend using oven mitts or pot holders when removing food from the countertop oven. WARNING: Cooked food can be very hot. Handle with care. Do not leave countertop oven unattended. Reheat For optimal results, place wire rack in the desired rack position. 1. Insert the wire rack in desired rack position. 2. Place food on an oven-safe accessory.
6. When warming cycle is complete, an audible alert will sound. 7. Open countertop oven door fully and remove food carefully. We recommend using oven mitts or pot holders when removing food from the countertop oven. WARNING: Cooked food can be very hot. Handle with care. Do not leave countertop oven unattended. Defrost For optimal results, place wire rack in the upper rack position. 1. Insert the wire rack into the upper rack position. 2. Ensure the countertop oven door is closed for preheating. 3.
6. Press the START button to begin preheating. PREHEATING will appear on the LCD screen. 7. Once preheating is complete, an audible alert will sound. The START button will flash. 8. Press the START button to begin the dehydrate cycle. Note: An audible alert will sound and repeat in 1-minute intervals once the oven has preheated until the START button is pressed. The oven will automatically begin the baking cycle if the START button is not pressed after 5 minutes. 9.
4. Press the TURBO CONVECT button for better air circulation and crispier food if needed. The turbo convection fan will appear on the LCD screen to indicate that Turbo Convection is on. To cancel convection setting, press the TURBO CONVECT button once more. 5. Press START to begin setting the second cooking function. Turn the Function Selector Dial to select the function. Once the function has been selected, use the Time/Temperature Control Dial to select the desired cooking temperature and time.
This appliance has no user serviceable parts. Any servicing beyond that described in the Cleaning Section should be performed by an Authorized Service Representative only. See warranty available online. CHANGING THE LIGHTBULB • Remove all accessories from the Countertop Oven. • Remove Interior Light bulb cover by turning it counter-clockwise, and then pull out interior light bulb. • Insert new 25w 120v G9 bulb, per instructions on light bulb package.
ERROR CODE TROUBLESHOOTING Error Code Meaning E01 Heater malfunction E02 E03 E05 Thermal controller malfunction Oven temperature overheat Cooling fan malfunction Troubleshooting Steps Turn off unit, unplug, wait 30 secinds before plugging back in. Turn off unit, unplug, wait 30 secinds before plugging back in. Unplug unit & allow to cool before plugging back in. Unplug unit & allow to cool before plugging back in.
WARRANTY 3 YEAR LIMITED WARRANTY Calphalon (“Calphalon”) warrants that for a period of three year from the date of purchase, this product will be free from defects in material and workmanship. Calphalon, at its option, will repair or replace this product or any component of the product found to be defective during the guarantee period. Replacement will be made with a new or remanufactured product or component.