User Guide Calibrated Software, Inc.
Copyright 2008 Calibrated Software, Inc. All rights reserved. www.calibratedsoftware.com Your rights to the software are governed by the accompanying Software License Agreement. Please read the entire User Guide and Software License Agreement before installation, ordering or use. By installing, ordering or using this software you are agreeing to the Software License Agreement.
Contents GETTING STARTED ..................................................................................................... 8 Overview ............................................................................................................................................................................. 8 DEMO MODE Limitation .....................................................................................................................................................
Adobe Premiere Pro CS6/CC/CC2014 - MOV ................................................................................................................. 23 Getting Started ......................................................................................................................................................... 23 Using a Preset Setting for 8-bit YUV422 Export in PPro .........................................................................................
Adobe Premiere Pro CS6/CC/CC2014 - MOV ................................................................................................................. 39 Getting Started ......................................................................................................................................................... 39 Using a Preset Setting for 8-bit YUV422 Export in PPro .........................................................................................
Refund Policy .................................................................................................................................................................... 60 TROUBLESHOOTING ................................................................................................. 61 General Questions ............................................................................................................................................................
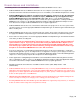
Getting Started 1 Overview Calibrated MPEG2-X Create is a QuickTime Codec(Encode Only) that enables you to encode QuickTime MPEG2-X MOV files** from 3rd party applications that support QuickTime. Calibrated MPEG2-X Create supports encoding to the following QuickTime XDCAM Compression Types**: XDCAM Long-GOP at 50Mb, 80Mb, 100Mb, 140Mb, 180Mb, 220Mb, 280Mb “Calibrated MPG2X LG 1080i29.97” – FourCC ‘xd5b’ - 1920x1080 interlaced footage at 29.
DEMO MODE Limitation Calibrated MPEG2-X Create will have watermarks of the Calibrated MPEG2-X Create Logo burned into any encoded video when running in DEMO MODE. This is the only DEMO MODE limitation – everything else is fully functional. The burned in DEMO MODE watermarks cannot be removed from the encoded video. After ordering and licensing Calibrated MPEG2-X Create you will have to re-encode any files that you had created while running the software in DEMO MODE.
Known Issues and Limitations The following known issues and limitations are associated with Calibrated MPEG2-X Create codec: Calibrated MPEG2-X Create for Windows will crash if run on a computer system that does not support SSE3 instructions which were introduced in Pentium 4 processors circa 2004 (see the Windows Requirements section).
Windows Requirements and Installation Ensure your PC meets the following requirements prior to installing Calibrated MPEG2-X Create: Pentium 4 processor with SSE3 support or greater; recommended at least Intel Core 2 Duo with two cores or two physical processors 32/64-bit Windows 7 or Vista (Business or Ultimate) or Windows 32-bit XP with SP3 (Win XP 64-bit is NOT supported) BETA Support for 32/64-bit Windows 8 - our software should work fine on Windows 8; however QuickTime Player does not offici
Uninstalling on Windows To uninstall Calibrated MPEG2-X Create on a Windows Computer: 1. If LICENSED, please use the Calibrated License Manager to DEACTIVATE your Software License before uninstalling 2. Go to the Control Panel>Add/Remove Programs. 3. Select and uninstall Calibrated MPEG2-X Create from the list of programs. 4. Restart your computer.
MAC OSX Requirements and Installation Ensure your Mac meets the following requirements prior to installing Calibrated MPEG2-X Create: MacIntel Computer Only; recommended at least Intel Core 2 Duo with two cores or two physical processors Mac Intel with OSX 10.6.8(Snow Leopard) or 10.7.5(Lion) or 10.8.5(Mountain Lion) or 10.9.4 (Mavericks) BETA Support ONLY for OS X 10.10 ( Yosemite ) QuickTime Player 7.6.6 or higher To view or playback XDCAM .
Installing on Mac OSX To install Calibrated MPEG2-X Create on a Mac Computer: 1. Quit any applications using QuickTime. 2. Run the Calibrated MPEG2-X Create Installer: a. A folder named Calibrated will be created in the /Applications directory. This Calibrated folder will contain the Calibrated MPEG2-X Create Options application (CalibratedMPEG2XCreateInfo.app will be located in the /Applications/Calibrated/Applications/Options folder), presets, and the Calibrated MPEG2-X Create User Guide. b.
Uninstalling on Mac OSX To uninstall Calibrated MPEG2-X Create on a Mac OSX Computer: 1. If LICENSED, please use the Calibrated License Manager to DEACTIVATE your Software License before uninstalling 2. If no other Calibrated Software is installed, then delete the directory: /Applications/Calibrated then skip Step 2 and go to Step 3 3. If other Calibrated Software is installed, then only delete: a. /Applications/Calibrated/Applications/Options/CalibratedMPEG2XCreateInfo.app b.
MOV Encode Options 2 Overview This chapter describes the settings available in the Calibrated MPEG2-X Create Options interface.
Version The version box shows the version of Calibrated MPEG2-X Create you are running and it display a webpage link of where to download the latest version. License The license box is where you see your Software License status. It will display a green LICENSED if you are properly licensed. Please note that the stand-alone Calibrated License Manager application is used to license the software. Please see the ‘Software License’ chapter in this User Guide for more information.
The following encode options are available for Calibrated MPEG2-X Create Important Note: The options can only be set from within the application that is using Calibrated MPEG2-X Create – look for a ‘settings’ or ‘options’ button in the application. You may have to set the options of Calibrated MPEG2-X Create in the application BEFORE every encode depending on the application using the codec, please see the ‘Windows Applications’ or ‘Mac OSX Applications’ chapter for more details.
RGB to YUV Matrix Setting the YUV Matrix enables you to control how RGB is converted to YUV. There are four RGB to YUV Matrix options: 601 SMPTE (16,235) 601 Full (0,255) 709 SMPTE (16,235) 709 Full (0,255) (DEFAULT) Generally, 601 equations are used for SD video and 709 equations are used for HD video. The Full option (the default value) converts RGB, which has black-white levels of 0-255 (0-65536 for 16-bit RGB), to YUV with black-white levels of 16-235 (64-940 for 10-bit YUV).
444 to 422 Chroma Sampling There are two options: Duplicate Values Average Next Neighbors (DEFAULT) This controls how chroma is interpolated when converting from RGB 444 -> YUV 422. ‘Average Neighbors’ will produce smoother colors when converting; ‘Duplicate Values’ was added to essentially ‘turn off’ the averaging. Important Note: The 444 to 422 Chroma Sampling setting will ONLY be used if an application sends RGB data to the code.
Windows Applications 3 Overview This chapter describes using Calibrated MPEG2-X Create for Windows in a few popular Windows applications. Important Note: The Calibrated MPEG2-X Create options page can only be accessed from within the application that is using Calibrated MPEG2-X Create – look for a ‘settings’ or ‘options’ button in the application - You may have to set the options of Calibrated MPEG2-X Create in the application before every encode.
Adobe After Effects CS6/CC/CC2014 - MOV Getting Started 1. Please make sure you have QuickTime Player 7.6 or 7.7 installed 2. IMPORTANT: Please make sure you have the Adobe Performance booster installed: This modified Adobe XML file is necessary to export at the proper 8-bit YUV422 color levels in Adobe After Effects. You can learn more and download it by clicking here. 3. To preserve the maximum bit depth, please make sure you have the ‘Preview’ in the After Effects ‘Composition Settings’ to UNCHECKED.
Adobe Premiere Pro CS6/CC/CC2014 - MOV Getting Started 1. Please make sure you have QuickTime Player 7.6 or 7.7 installed 2. Please make sure you have the Adobe Performance booster installed: This modified Adobe XML file is necessary to properly export at 8-bit YUV422 in all versions of Adobe Premiere Pro. You can learn more and download it by clicking here. 3.
Manually configuring for 8-bit YUV422 Export in PPro 1. In the ‘Export Settings’, please choose ‘QuickTime’ for the format 2. Click on the ‘Video’ Tab in the ‘Export Settings’ a. Choose the Calibrated MPEG2-X Create Compression Type that best matches your Sequence Settings in the ‘Video Codec’ drop down menu. (Please see the ‘Overview’ section at the beginning of this chapter to see what Compression Type matches best with your Sequence Settings) b.
Adobe Media Encoder CS6/CC/CC2014 - MOV Getting Started 1. Please make sure you have QuickTime Player 7.6 or 7.7 installed 2. Please make sure you have the Adobe Performance booster installed: This modified Adobe XML file is necessary to properly export at 8-bit YUV422 in all versions of Adobe Premiere Pro. You can learn more and download it by clicking here. 3.
Manually configuring for 8-bit YUV422 Export in AME 1. Right-click on the source you are exporting from AME and from the drop-down menu choose’ Export Settings’ for the Adobe Export Panel window to appear. In the ‘Export Settings’, please choose ‘QuickTime’ for the format 2. Click on the ‘Video’ Tab in the ‘Export Settings’ a. Choose the Calibrated MPEG2-X Create Compression Type that best matches your Sequence Settings in the ‘Video Codec’ drop down menu.
Avid Media Composer 6.0 & Greater - MOV Getting Started 1. Please make sure you have QuickTime Player 7.6 or 7.7 installed 2. IMPORTANT: Please note that Avid Media Composer appears to only export thru QuickTime using 8-bit RGB colorspace which will be converted to 8-bit YUV422 and then encoded to XDCAM in Calibrated MPEG2-X Create. Export Settings 1. In the ‘Export As’, please choose ‘QuickTime Movie’ for the format 2. Click on the ‘Custom’ Option and then press the ‘Format Options…’ button a.
QuickTime Player Pro 7.6/7.7 - MOV To export to any format you need to have QuickTime Player Pro 7.6/7.7 from Apple – HOWEVER – due to differences in how QuickTime Gamma is handled with different QuickTime codecs it is RECOMMENDED that you do NOT use QuickTime Player Pro 7.6/7.7 for exporting using Calibrated MPEG2-X Create for Windows.
Adobe After Effects CC/CC2014 - MXF Getting Started 1. Please make sure you have AME CC or AME CC2014 is installed. ( Exporting from AE CS6 is not supported) Exporting 1. When exporting from an AE Composition, please choose the ‘Add to Adobe Media Encoder Queue…’ 2.
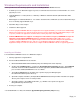
Adobe AME & Premiere Pro CS6/CC/CC2014 - MXF Getting Started Please make sure you have ExpCalibratedMPEG2XCreateOP1a.prm installed in the Adobe\Common\Plugins\7.0\ for CC/CC2014 support, and in the Adobe\Common\Plug-ins\6.0\MediaCore directory for CS6 support. MPEG2-X MXF Export in PPro/AME 1. In the ‘Export Settings’, please choose the format ‘Calibrated OP1a MPEG2-X MXF’ 2. Click on the ‘Video’ Tab in the ‘Export Settings’ (see picture below) a.
‘Video Tab’ in the ‘Export Settings’ for PPro/AME CC ‘Audio Tab’ in the ‘Export Settings’ for PPro/AME CC Page | 31
‘MetaData Tab’ in the ‘Export Settings’ for PPro/AME CC Page | 32
Other Windows applications When encoding XDCAM MOV files from other Windows applications, please be aware of the following: 1. Even though Calibrated MPEG2-X Create supports encoding from 8-bit YUV422 colorspace, it is up to the application using Calibrated MPEG2-X Create to send that colorspace to the codec. From our research, many applications only support 8-bit RGB(A) colorspaces when encoding to a MOV file. 2.
Mac OSX Applications 4 Overview This chapter describes using Calibrated MPEG2-X Create for Windows in a few popular Windows applications. Important Note: The Calibrated MPEG2-X Create options page can only be accessed from within the application that is using Calibrated MPEG2-X Create – look for a ‘settings’ or ‘options’ button in the application - You may have to set the options of Calibrated MPEG2-X Create in the application before every encode.
Final Cut Pro 7 - MOV 1. Please make sure you have FCP7.0.3 installed (earlier versions of FCP have not been tested) 2. Please make sure you have installed the Calibrated MPEG2-X Create presets for Compressor 3.5 3. Please use the ‘Send to Compressor’ option in FCP 7 to export MOV files using Calibrated MPEG2-X Create. Please see the Compressor sections in this chapter for more details.
Final Cut Pro X - MOV Getting Started 1. Please make sure you have FCP X 10.1.2 or greater installed 2. Please make sure that the Calibrated MPEG2-X Create Compressor 4 presets are installed in the folder For Compressor 4.1.
Compressor 3.5.3/4.1.2 - MOV Getting Started 1. If you are using Compressor 3.5, please make sure you have Compressor 3.5.3 installed, and if you are using Compressor 4, please make sure you have Compressor 4.1.2 installed. Earlier versions of Compressor have not been tested. 2. Please make sure that the Calibrated MPEG2-X Create Compressor presets are installed in the folder For Compressor 3.5.3 use this folder: /Users/[YOUR_ACCOUNT]/Library/Application Support/Compressor/ For Compressor 4.1.
Adobe After Effects CS6/CC/CC2014 - MOV Getting Started 1. Please make sure you have QuickTime Player 7.6 or 7.7 installed 2. IMPORTANT: Please make sure you have the Adobe Performance booster installed: This modified Adobe XML file is necessary to export at the proper 8-bit YUV422 color levels in Adobe After Effects. You can learn more and download it by clicking here. 3. To preserve the maximum bit depth, please make sure you have the ‘Preview’ in the After Effects ‘Composition Settings’ to UNCHECKED.
Adobe Premiere Pro CS6/CC/CC2014 - MOV Getting Started 1. Please make sure you have QuickTime Player 7.6 or 7.7 installed 2. Please make sure you have the Adobe Performance booster installed: This modified Adobe XML file is necessary to properly export at 8-bit YUV422 in all versions of Adobe Premiere Pro. You can learn more and download it by clicking here. 3.
Manually configuring for 8-bit YUV422 Export in PPro 1. In the ‘Export Settings’, please choose ‘QuickTime’ for the format 2. Click on the ‘Video’ Tab in the ‘Export Settings’ a. Choose the Calibrated MPEG2-X Create Compression Type that best matches your Sequence Settings in the ‘Video Codec’ drop down menu. (Please see the ‘Overview’ section at the beginning of this chapter to see what Compression Type matches best with your Sequence Settings) b.
Adobe Media Encoder CS6/CC/CC2014 - MOV Getting Started 1. Please make sure you have QuickTime Player 7.6 or 7.7 installed 2. Please make sure you have the Adobe Performance booster installed: This modified Adobe XML file is necessary to properly export at 8-bit YUV422 in all versions of Adobe Premiere Pro. You can learn more and download it by clicking here. 3.
Manually configuring for 8-bit YUV422 Export in AME 1. Right-click on the source you are exporting from AME and from the drop-down menu choose’ Export Settings’ for the Adobe Export Panel window to appear. In the ‘Export Settings’, please choose ‘QuickTime’ for the format 2. Click on the ‘Video’ Tab in the ‘Export Settings’ a. Choose the Calibrated MPEG2-X Create Compression Type that best matches your Sequence Settings in the ‘Video Codec’ drop down menu.
Avid Media Composer 6.0 & Greater - MOV Getting Started 1. Please make sure you have QuickTime Player 7.6 or 7.7 installed 2. IMPORTANT: Please note that Avid Media Composer appears to only export thru QuickTime using 8-bit RGB colorspace which will be converted to 8-bit YUV422 and then encoded to XDCAM in Calibrated MPEG2-X Create. Export Settings 1. In the ‘Export As’, please choose ‘QuickTime Movie’ for the format 2. Click on the ‘Custom’ Option and then press the ‘Format Options…’ button a.
QuickTime Player Pro 7.6/7.7 - MOV To export to any format you need to have QuickTime Player Pro 7.6/7.7 from Apple – HOWEVER – due to differences in how QuickTime Gamma is handled with different QuickTime codecs it is RECOMMENDED that you do NOT use QuickTime Player Pro 7.6/7.7 for exporting using Calibrated MPEG2-X Create for Windows.
Adobe After Effects CC/CC2014 - MXF Getting Started 1. Please make sure you have AME CC or AME CC2014 is installed. ( Exporting from AE CS6 is not supported) Exporting 1. When exporting from an AE Composition, please choose the ‘Add to Adobe Media Encoder Queue…’ 2.
Adobe AME & Premiere Pro CS6/CC/CC2014 - MXF Getting Started Please make sure you have ExpCalibratedMPEG2XCreateOP1a.prm installed in the Adobe\Common\Plugins\7.0\ for CC/CC2014 support, and in the Adobe\Common\Plug-ins\6.0\MediaCore directory for CS6 support. MPEG2-X MXF Export in PPro/AME 1. In the ‘Export Settings’, please choose the format ‘Calibrated OP1a MPEG2-X MXF’ 2. Click on the ‘Video’ Tab in the ‘Export Settings’ (see picture below) a.
‘Video Tab’ in the ‘Export Settings’ for PPro/AME CC ‘Audio Tab’ in the ‘Export Settings’ for PPro/AME CC Page | 47
‘MetaData Tab’ in the ‘Export Settings’ for PPro/AME CC Page | 48
Final Cut Pro X - MXF Getting Started 1. Please make sure you have FCP X 10.1.2 or greater installed 2. Please make sure that the Calibrated MPEG2-X Create Compressor 4.1.2 presets are installed in the folder For Compressor 4.1.
Final Cut Pro 7 - MXF Getting Started 6. Please make sure you have FCP7.0.3 installed (earlier versions of FCP have not been tested) 7. Please make sure that the Calibrated MPEG2-X Create Compressor MXF presets are installed in the folder For Compressor 3.5.3 use this folder: /Users/[YOUR_ACCOUNT]/Library/Application Support/Compressor/ 8.
Compressor 3.5.3/4.1.2 - MXF Getting Started 1. If you are using Compressor 3.5, please make sure you have Compressor 3.5.3 installed, and if you are using Compressor 4, please make sure you have Compressor 4.1.2 installed. Other versions of Compressor have not been tested. 2. Please make sure that the Calibrated MPEG2-X Create Compressor presets are installed in the folder For Compressor 3.5.3 use this folder: /Users/[YOUR_ACCOUNT]/Library/Application Support/Compressor/ For Compressor 4.1.
(i) MXF Source Package Name will default to the ‘Author’ from the Compressor Job Annotation 5. You can also create your own presets in Compressor. Please go to the section to learn how to create your own presets.
Creating a MXF Preset in Compressor 3.5.3 IMPORTANT – always remember to set the ‘Field Version’ in the Options settings for the version of Compressor that you are using First select the ‘+’ button in the Settings window and choose ‘Calibrated OP1a MPEG2-X MXF’ in the drop-down menu This will add a new ‘Untitled Calibrated OP1a MPEG2-X MXF’ preset in the Settings window. Make sure that this new preset is highlighted and then press the ‘Options’ button to open the preset options.
Creating a MXF Preset in Compressor 4.1.2 IMPORTANT – always remember to set the ‘Field Version’ in the Options settings for the version of Compressor that you are using First select the ‘+’ button in the Settings window and choose ‘New Setting…’ in the drop-down menu In the window that pops-up, choose ‘Calibrated OP1a MPEG2-X MXF’ from the list of formats This will add a new ‘Untitled Calibrated OP1a MPEG2-X MXF’ preset in the Settings window.
By pressing the ‘Configure’ button you will bring up the ‘Options’ panel to configure the preset. See the section below: Options Panel in Compressor 3.5.3/4.1.2 for setting the different options in your new preset.
MXF Options Panel in Compressor 3.5.3/4.1.2 Calibrated MPEG2-X Create supports creating the following OP1a XDCAM MXF files: XDCAM Long-GOP at 50Mb, 80Mb, 100Mb, 140Mb, 180Mb, 220Mb, 280Mb “Calibrated MPG2X LG 1080i29.97” - 1920x1080 interlaced footage at 29.97fps “Calibrated MPG2X LG 1080i25” –1920x1080 interlaced footage at 25fps “Calibrated MPG2X LG 1080p59.94” –1920x1080 progressive footage at 59.94fps “Calibrated MPG2X LG 1080p50” –1920x1080 progressive footage at 50fps “Calibrated MPG2X LG 1080p29.
The below Options panel can help you configure your preset in Compressor 1. Video Options a. Video Codec: This lets you set the resolution, framerate, and field type that you wish to encode into b. Video BitRate: This lets you set the bitrate of the encoded video c. Field Version: IMPORTANT – you must set this for the version of Compressor that you are using d. Sequence Type: (i) (ii) I-Frame Only Long-Gop e. # of CPU’s for Encoding: This lets you set the amount of CPU’s used for the encoding.
(iii) The ‘Manually set Audio Layout’ option will let you manually set the audio layout to tell Compressor to send to the plugin d. Audio Layout: This is where you would manually set the ‘Audio Layout’ if the ‘Audio Auto’ option is set to ‘Manually set Audio Layout’. Please note that no matter which Audio Layout is manually selected – the exported media will only store audio in a 2, 4, 6, 8, 10, 14, 16, 24, or 32 channel discrete configuration. 3. TimeCode Options a.
Other Mac OSX applications When encoding XDCAM MOV files from other Mac OSX applications, please be aware of the following: 1. Even though Calibrated MPEG2-X Create supports encoding from 8-bit YUV422 colorspace, it is up to the application using Calibrated MPEG2-X Create to send that colorspace to the codec. From our research, many applications only support 8-bit RGB(A) colorspaces when encoding to a MOV file 2.
Software License 5 Software License Agreement By downloading, installing, ordering, or using the software - you are agreeing to the Software License Agreement. You can download or view the Software License Agreement on our website: http://www.calibratedsoftware.com/SoftwareLicenseAgreement.
Troubleshooting 6 General Questions 1. I cannot see any of the ‘Calibrated MPEG2-X’ Compression Types when trying to export from my application? Calibrated MPEG2-X Create may not be properly installed: On Mac OSX, please make sure that the CalibratedMPEG2XEncodeCodec.component is in the /Library/QuickTime folder (that’s the Library folder on the Main Harddrive NOT the Library folder in the User directory) On Windows, make sure QuickTime Player 7.6.
Version History 7 Version 1.0.