
User manual


6
Owner’ Manual
Warnings Before Installation
The area around the ground connection should be clean, bare metal
without rust, paint, plastic or dirt for a good electrical connection.
• If noise is still experienced when the motor of the vehicle acceler-
ates, a choke should be placed in line with the power to the unit. The
installation company will know what is required.
• When replacing the fuse(s) the replacement must be of the same
amperage as shown on the fuse holder. Never replace a fuse with
another of a different value. If the fuse blows again please contact
your installation company.
• Do not block vents or heater panels. Blocking them will cause heat
to build up inside and may result in fire.
• Double check that all wiring and connections are correct before
re-connecting the battery and turning on the unit.
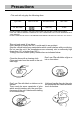
• After completing the installation and before operating the unit, recon-
nect the battery, Then press the (RES) button with a pointed object,
such as a ball-point pen to set the unit to its initial status. After push-
ing the button, wait a few seconds for the red light to flash.
Tools for Installation
• 2 removal wrenches are supplied for taking out the old unit and place
with this brand name car radio. The following tools and supplies may
also be needed for the installation:
Tools for Installation:
- Philips Screw-drivers
- Wire Stripper
- Wire Cutter
- Hammer
- Pencil
- Electrical Tape
- Electric Drill
Supplies for Installation:
- Machine Screws
- Crimp Connectors
- 14 Gauge Wire for Power
Connections
- 14-16 Gauge Speaker Wires
* The above are not supplied.