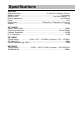
Specifications GENERAL Operating Power......................................................12 Volts DC, Negative Ground Speaker output.......................................................................................4 speakers RCA line out...........................................................................low-level outputs - 1V Output Impedance............................................................................... 4 to 8 Ohms Fuses........................................................
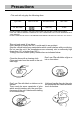
Precautions • This unit will only play the following discs. Type of disc Label on the disc CD, MP3, WMA Recorded material Size of disc Audio only 12 cm DO NOT ATTEMP TO MODIFY THE UNIT, MODIFYING THE UNIT MAY CAUSE AN ACCIDENT. STOP THE VEHICLE BEFORE CARRYING OUT ANY OPERATION THAT COULD INTERFERE WITH YOUR DRIVING. DO NOT TURN ON THE UNIT IF THE TEMPERATURE INSIDE THE VEHICLE IS OUT OF -20’C TO 60’C. This unit only reads 12 cm discs.
Warnings Before Installation Important Warnings to Take Note of BEFORE Commencing Installation Damage Caused By Incorrect Installation or Usage is NOT Covered By Warranty. PLEASE Take The Time To Read The Installation Notes Carefully. • To avoid shorts in your vehicles electrical system, be sure to disconnect the battery cable before beginning installation. • This unit is intended for vehicles with a 12-volt battery and negative grounding.
Warnings Before Installation • If this unit is installed in a vehicle that does not have an ACC (accessory) position on the ignition switch, the red lead of the unit should be connected to a terminal coupled with ignition switch ON/Off operations. If this is not done, the vehicle battery may be drained when you are away from the vehicle for several hours. • Secure the wiring with cable clamps or adhesive tape. To protect the wiring, wrap adhesive tape around them where they lie against metal parts.
Warnings Before Installation The area around the ground connection should be clean, bare metal without rust, paint, plastic or dirt for a good electrical connection. • If noise is still experienced when the motor of the vehicle accelerates, a choke should be placed in line with the power to the unit. The installation company will know what is required. • When replacing the fuse(s) the replacement must be of the same amperage as shown on the fuse holder.
Before You Install Automotive audio equipment installations can be troublesome at times, even to the most experienced of installation technicians. If you are not confident working with electrical wiring, removing and reinstalling interior panels, carpeting, dashboards or other components of your vehicle, please call your dealer in order to have the unit professionally installed. IMPORTANT: Remove the two transport screws from the top of the unit before installing. 1.
Installation WARNING! Disconnect negative battery terminal from battery before starting installation. Consult the vehicle’s owner’s manual for proper instructions. NOTE: Mark the polarity of the existing speaker wires before disconnecting battery. NOTE: Remove the two transport screws from the top of the unit before installing. DIN Front Mount 1. After removing the old radio and mounting sleeve, insert supplied mounting sleeve into opening. 3. Attach wires from the unit to existing wires.
Installation NOTE: Outer trim frame, hook, and mounting sleeve are not used for this installation. This is only intended as a general guide; contact the vehicle's manufacturer for specific instructions. This method of installation uses the screw holes at the sides of the unit and the holes of the existing vehicle mounting bracket. 1. Remove the hooks on both sides. 2. Align the screw holes of the mounting bracket supplied with the car and the screw holes of the main unit.
Wiring Connections Make sure that you have a good chassis ground. Good ground connections will eliminate most electrical noise problems. A good chassis ground requires a tight connection to the vehicle’s metal chassis. The area around the ground connection should be clean, bare metal without rust, paint, plastic, dust, or dirt for a good electrical connection. MIC SUBx2 RCA OUT Antenna DAB socket (Optional) left=white right=red Connector A 1. Rear right speaker(+)/Purple 2.
Wiring Connections White Panel Light Connect to lighting circuit of vehicle. This will illuminate the buttons on the display for night time operation. This wire can also be connected to the Orange Remote wire to activate the buttons when the unit is powered on. DO NOT JOIN THE WHITE WIRE TO THE LIGHTING CIRCUIT OF THE VEHICLE IF CONNECTED TO THE ORANGE REMOTE WIRE. Speaker Wiring Notes Follow the above wiring diagram to install the head unit with new or existing speakers.
Basic Operation al) unit play ong e by next ton. opnnot ra- 1. Tuning the unit On / Off Press PWR Button to turn the unit on, the display will show a message WELCOME to indicate it is ready for use. Press and hold the PWR button to turn the unit off. The display will show a message “GOODBYE”. 2. Mode Selection Press the MOD Button to select Radio Mode. Press the MODE Button to cycle the Play Mode amoung AUX, RADIO and CD PLAY.
RadioOperation Operation Radio 1. Choose Radio Band Press the BND Button anytime to access the radio function. The unit comes with five bands- three FM Bands (FM1, FM2, and FM3) and two AM Bands (AM1, and AM2). Each of the five bands can store up to six preset stations, for a total of 30 preset memory stations. ing to. B. Scan Saved Stations Press the F/PS button once to perform the scanning functions.
perFM and will AM s of the VOL OC lay, n; lay, on. setion, hich DAB DAB the lisow- how the RDS Operation (Optional) RDS Function RDS ( Radio Data System) service availability varies with areas. Please understand if RDS service is not available in you area, the following service is not available, either. 1. AF-ALTERNATIVE FREQUENCY a. In RDS mode, press the AF button on the panel to turn the AF function on or off.
Bluetooth Operation Bluetooth Operation (Optional) 1. Pairing The bluetooth of this radio is always in standby mode for pairing and connection, signalled by a blinking bluetooth icon on the LCD Display. At this blinking time, please run the bluetooth search and connect function in your cellphone. The car radio model no “RCD234DBT Caliber” will be shown on the cellphone. Select this car radio and connect to finish the pairing.
CD/MP3/WMA/USB/SD Operation 1. Insert / Eject CD Insert a disc into CD slot with label side up. The disc will be automatically loaded into the unit, even when it is off or at radio mode. The word “LOAD” will blink on the display and the CD will play automatically. Press the EJECT Button to eject the disc from the slot. If the disc is not removed from the slot within 5 seconds, it will automatically be loaded into the slot again.
CD/MP3/WMA/USB/SD Operation sen track will start to play. MAINTENANCE C. Folder Search Press the F/PS Button twice and NAVIGATE will be shown on the display.Use the VOL +/- Button to select the folder name. Then press the SEL Button to play the chosen folder. 11. Electronic Skip Protection Electronic Skip Protection is for driving on rough roads. The CD will play for 10 seconds on rough roads witout skipping. if driving on a rough road for more than 10 seconds the CD may skip.
al) Simple Troubleshooting Guide PROBLEM CAUSE/SOLUTION No Power Check and make sure that the fuses did not blow. Errors are displayed on the screen or no function is active Unplug your car radio then plug it again No radio reception Check the connection of the antenna. Make sure the antenna is completely extended and that it is not broken CDs cannot be loaded A CD is already inside the appliance. Make sure that the fixing screws of the CD mechanism have been removed.