
User manual
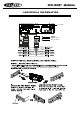


RCD 120BT o MANUAL
INPUT THE SD CARD
The SD oblique angle keeps
rightward exposure, put into
the SD slot and press it again
to eject.
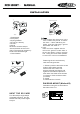
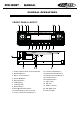
1. Dashboard
2. Nut (5mm)
3. Spring Washer
4. Screw (5 x 25mm)
5. Screw
2. Insert fingers into the groove in the
front of fram e and pul l out to remove
the frame. (When reatt achi ng the
frame, point the side with a groove
dow nwards and attach it.)
3. Leve r
Insert the leve rs sup plied with the
uni t into the grooves at both si des of
the uni t and show n in figure unti l they
click. Pull in g th e le vers makes possible
to re move the unit fro m the dashboard.
DIN REAR-MOUNT (Method B)
Installation using the screw holes on
the sides of the unit
Fastening the unit to the factory
radio mounting bracket:
1. Select a position where the screw
holes of the bracket and the
screw holes of the main unit
become aligned (are fitted), and
tighten the screws at 2 places on
each side. Use either truss screws
(5 x 5mm) or flush surface screws
(4 x 5mm)
2. Screw
3. Dashboard or Console
INSTALLATION
6. Strap
Be sure to use the strap to
secure the back of the unit in
place. The strap can be bent by
hand to the desired angle.
7. Plain Washer
2
3
2
2
1
3
(Fig. 3)
Removing the unit
1
2
3
4
5
6
7
(Fig. 2)