
User manual


04
ADDITIONAL INFORMATION
17
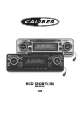
RE AR Lc h LI NE OUT
RE AR Rc h LI NE OUT
BLUE
WHITE
WHITE/BLACK
GREEN
GREEN/BLACK
RED YELLOW
BLACK
GREY
GREY/BLACK
VIOLET
VIOLET/BLACK
B. T. ANT ENNA
SPECIFICATION
General
Power Supply Requirements:
DC 14. 4V“ ”, Negative Ground
Maximum Output Power:
Chassis Dimensions: 178 x 163x 50mm (W x D x H)
Tone Controls
Bass (at 100Hz):
+10dB / -10dB
Treble (at 10K):
+10dB / -10dB
Current Drain:
10A
CD Player
Signal to Noise Ratio:
More than 60dB
Channel Separation:
More than 60dB
Frequency Response:
20Hz - 20KHz
FM Radio
Frequency Coverage (MHz):
87.5 - 108MHz
IF :
10.7MHz
Sensitivity (S/N-30dB):
12dBu
Stereo Separation:
>30dB
75W x 4(CH)
Load
Impedance:
4 ohms
Remarks:
Specifications subject to change without notice
INPUT THE SD CARD
The SD oblique angle keeps
rightward exposure, put into
the SD slot and press it again
to eject.
03
1. Dashboard
2. Nut (5mm)
3. Spring Washer
4. Screw (5 x 25mm)
5. Screw
2.Insert fingers into the groove in the
front of frame and pul l out to remove
the fram e. (When reatt achi ng the
frame, point the side with a groove
dow nwards and attach it.)
3.Leve r
Insert the leve rs sup pl ied with the
uni t into the grooves at both si des of
the uni t and show n in figure unti l they
click. Pull ing the le vers makes possible
to remove th e unit fro m th e dashboard.
DIN REAR-MOUNT (Method B)
Installation using the screw holes on
the sides of the unit
Fastening the unit to the factory
radio mounting bracket:
1. Select a position where the screw
holes of the bracket and the
screw holes of the main unit
become aligned (are fitted), and
tighten the screws at 2 places on
each side. Use either truss screws
(5 x 5mm) or flush surface screws
(4 x 5mm)
2. Screw
3. Dashboard or Console
INSTALLATION
6. Strap
Be sure to use the strap to
secure the back of the unit in
place. The strap can be bent by
hand to the desired angle.
7. Plain Washer
2
3
2
2
1
3
(Fig. 3)
Removing the unit
1
2
3
4
5
6
7
(Fig. 2)
18
Before playing a CD, wipe it off with a clean, dust-free cleaning cloth.
Wipe the disc in the direction of the arrow.
Always insert the CD with the label side facing upwards.
If the CD is inserted with the printed side facing downwards, the device
may be damaged.
Note: If there is already a CD in the CD slot , do not try to insert a second
CD. This may damage the device.
Always hold CDs by the edge. In order to keep the CD clean do not touch
the surface. Pull out the CD as follows.
Do not attach any sticker or adhesive tape on the CD.
Do not expose the CD to direct sunlight or sources of heating.
Do not leave CDs in a car if it parked in direct sunlight as that will lead to
a considerable rise in the temperature inside the car.
Note: Do not use any solvents such as petrol or thinning agents. Commercially
available cleaning substances of antistatic spray will damage the device.
BEFORE PLAYING DISCS
Cleaning the CD
RCD 120BT(/B) • MANUAL RCD 120BT(/B) • MANUAL
Bluetooth Freq range: 2402-2480 Mhz
Max e.r.p: <100mW/20dBm