
Installation Guide


Questions? (888) 788-2254
www.CaliFloors.com
GeoWood
®
Flooring Installation Guide
Installation
Glue-Down Installation of GeoWood Flooring by Cali Bamboo
Before laying: Measure the room at right angle to the direction of the planks. Planks in the final row should be at
least 2” wide. Due to this rule, planks in the first row can be cut to smaller size. Shuffle planks to obtain a pleasant blend
of shades. Lay planks preferably following the direction of the main source of light. We recommend laying on wooden floors
crossways to the existing floorboard. You should never nail or screw planks to the subfloor.
• Floor should be installed from several cartons at the same time to ensure good color, shade and appearance.
Expansion gaps: Even though Cali Bamboo GeoWood Plank will have very minimal expansion and contraction it is still
required to leave 3/8” expansion space around the perimeter as well as all fixed objects (tile, fireplace, cabinets). A
t-molding must be used in doorways and openings between rooms 3 feet wide or less.
• When installing using the glue down method the use of transition pieces becomes optional.
• To cover your expansion space, Cali Bamboo carries matching wood flooring moldings that include reducers,
t-moldings, baseboards, quarter rounds, and thresholds. Matching stair parts are also available; including stair nosing,
treads and risers. Please visit Cali Bamboo’s Flooring Accessories webpage. Please note: accessory offerings differ
between GeoWood Bamboo and GeoWood Oak.
Tip: When installing around pipes, drill the hole 3/4” larger than the diameter of the pipes.
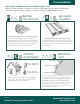
Installing the First Row:
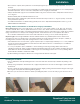
1. Start out by pouring adhesive on to the subfloor. Make sure you do not pour out too much at one time. Cali Bamboo
does not recommend spreading more than an arm’s length (6 to 8 feet) worth of adhesive at a time. This will help to
ensure the glue does not flash over before you can adhere the planks.
2. Use tapping block as necessary to fit planks together but be careful not to let installed floor move on the wet adhesive
while you are working. Repeat these steps as you move along with the installation.
3. It is recommended to start by installing the first 3 rows at the same time. This will help to minimize any shifting of the
product.
4. Start by using a full plank to start the first row, roughly a half plank for the second row and roughly a quarter plank for
the third row.
5. Once the 3 pieces have been installed continue by installing full planks on each row until you get to the end of each
row.
6. The first 3 planks should be installed by angling the plank up slightly, pushing forward and interlocking the side tongue.
The long side of the plank should fit snug with no gapping.
Next Steps:
7. Installing the second plank of the first row requires engaging the butt ends together. Please note the plank is not yet
“locked” in place.
8. Install the second plank of the second row. Position the long side of the plank with the tongue side, fully engage into the
receiver of the first row of product. Lower the plank to the floor insuring that the end joint is overlapping and perfectly
aligned, with firm pressure; push the end joint downward till the end of the plank snaps in place.
9. Continue the installation by repeating step 6. It is important to make sure that the first three rows are straight and
square as they can affect the entire installation.
10. Cut the final board in each row to proper length and install. If cut pieces are at least 8 inches in length, they can be
used as starter pieces in another row. Caution when doing this make sure to not create a repeating pattern
11. Once the first three rows have been completed you can continue the install one row at a time.
Installing the Final Row:
12. The last row may need to be cut lengthwise (ripped). Make sure ripped piece is at least 2 inches in width.
13. Place the last row of boards to be fit on top of the last row of installed boards. Use a piece of plank or tile as a scribe to
trace the contour of the wall.
14. Mark where the board will be cut. If the fit of the wall is simple and straight, simply measure for the correct fit and cut.
15. After boards are cut, position boards and tap all joints (long AND short ends) with the rubber mallet.
Page 13