
Install Instructions


10
12. Reconnect the expansion vessel to the other components of the solar thermal system.
13. Set the operating pressure of the solar thermal system by means of the flushing and filling
station 5 to 7 psi (0.3 to 0.5 bars) higher than the inlet pressure of the expansion tank.
14. If you have put the flushing and filling station into operation to set the operating pressure,
switch off the filling pump.
15. Close the fill and drain ball valves (3 and 5) and open the ball valve (4).
16. Put the check valves in flow and return in operating position by turning the ball valves (1 and
2) to a 0° position with an open-ended 14 mm wrench.
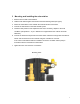
17. Manually put the solar thermal pump in operation at the highest RPM level (see controller
manual) and let it circulate for at least 15 minutes.
18. During flushing, bleed the solar thermal system several times at the air vent (6), until the
discharged solar fluid is free of air bubbles and increase, if required, the system pressure to
the operating pressure.
19. Remove the hoses of the flushing and filling station and screw the caps onto the fill and
drain ball valves.
Setting the solar thermal system:
20. Set the required RPM level of the solar thermal pump in relation to the required flow rate.
The flow rate should be set in accordance with the collector manufacturer’s data.
21. It is possible to reduce the maximum flow rate by switching down the pump at the control
switch. It should be checked whether the starting torque is sufficient with low pump speed.
Another way of limiting the flow rate is to partially close the ball valve (4) (higher pressure
drop – lower flow rate).
22. Attach the front insulation cover to the solar station.
23. Insert the red thermometer in the flow (left) and the blue thermometer in the return (right).
24. Set the pump automatic operation on the controller (see controller manual).