
User Guide


Service Instructions
There is no service required for the hydraulic separator.
CAUTION:
Corrosion or leakage can cause damage or injury.
Periodically inspect for signs of corrosion or leakage. If corrosion or
leakage is note, the vent must be replaced. Failure to follow these
instructions could result in property damage and/or personal injury.
B
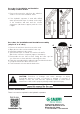
Procedure for installation and insulation assembly
(only for 2” to 4” sizes)
1. Remove the two black head covers at the ends.
2. Open the two side sections and the lower cap.
3. Install the separator in the system.
4. Spread a thin layer of sealant over surfaces A and B.
Wait for the solvent to evaporate (approx. 10 minutes).
5. Reassemble the two side sections, fitting the lower cap into
one of the two sections and then connecting the other.
6. Finish the assembly with the adhesive tape provided in the box.
7. Complete with the two black head covers.
8. Fit the automatic air vent and the drain valve.
Procedure for installation and insulation
assembly on union models
1.
Remove the protective strip from the adhesive
surface. Re-close the insulation shells.
2. If the hydraulic separator is used with chilled
water spread a thin layer of sealant on the edge
of the insulation and wait until the solvent
evaporates (10 minutes approx
)
and the close
it again.
A
Caleffi North America, Inc.
3883 West Milwaukee Road
Milwaukee, WI 53208
T: 414.238.2360 F: 414.238.2366
7-19-18