
User Manual
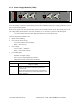
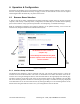

Table Of Contents
120 20195-100 Preliminary Paragon4 – UHF, 700, & 800MHz User Manual
1
6
4.2 LAN Setup
On a PC running MS-Windows with an existing LAN connection, connect either to the ETH1 (Data) or to
ETH2 (Setup) RJ-45 input of the Paragon4 base station.
1. Click Start Î Settings Î Control Panel Î Network and Dial-up Connection
2. Click on the relevant Local Area Connection
3. On the Local Area Connection Status screen, click Properties
4. On the Local Area Connection Properties screen, scroll the List Box until “Internet Protocol
(TCP/IP)” is highlighted, click Properties
5. On the Internet Protocol (TCP/IP) Properties screen, follow either method below:
A) If using ETH2 (Setup LAN), select “Obtain an IP address automatically”
B) Select “Use the following IP address” Î Enter 192.168.202.2 (if ETH2 enter 192.168.203.2) in
the IP address field Î 255.255.255.0 in the Subnet mask Î Leave the Default gateway blank.
6. Click the OK button
Note: On computers running Windows 9X, reboot to complete the connection process.
Steps above specifically apply to MS-Windows 2000. Modify as necessary for the OS you are running
4.3 Default IP Settings
• Paragon4 radio modem supports the Router (IP Forwarding) mode
4.3.1 Ethernet Interface 1 (DATA)
• MAC: 00:0A:99:XX:YY:ZZ
• IP ADDR: 192.168.202.1
• NETMASKS: 255.255.255.0
• Default Gateway: 0.0.0.0
• DHCP Client Disabled
• RIPv2 Disabled
4.3.2 Ethernet Interface 2 (SETUP)
• MAC: 00:0A:99:XX:YY:ZZ + 1
• IP ADDR: 192.168.203.1
• NETMASKS: 255.255.255.0
• DHCP Server Disabled
• NAT Disabled
4.3.3 RF Interface
• MAC: 00:XX:YY:ZZ
• IP ADDR: 10.XX:YY:ZZ
• NETMASK: 255.0.0.0
• Compression Enabled
• Encryption Disabled