
Technical Manual
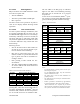
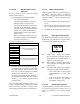
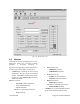
Table Of Contents
- PRODUCT OVERVIEW
- Installation
- Operating Description
- WinRIS program
- Testing and Trouble-Shooting
- Radio Programming and Adjustments
- Series I 800MHz Radio Programming
- Series I 800MHz Radio Tuning
- Series II Radio Programming
- Series II Radio Tuning
- Specifications

120 20170-201 Paragon
PD
Technical Manual
20
bearing an icon) for commonly used tasks as
follows:
!
Put From button
! Get button
Get As button
and to the right of a bar separator, the:
! About button and the
! Context-sensitive Help button
• An Indicator and Button bar, located im-
mediately below the Toolbar row, it con-
tains two circular indicators
!
DSR signal is High indicator
! CTS signal is High indicator
and three buttons for commonly used tasks as
follows.
! Station Reset button
! Modulated TXON button
! Unmodulated TXON button
• A Product field, displays product type be-
ing used after a connection to the product
has been established. Illustration used indi-
cates a Gemini
PD
product connection.
• A Data section, containing the Banner plus
the Comments and Password fields and their
related Put buttons.
• A Channel(s) section, to select and activate
a channel for Gemini
PD
products. The
“Channels” selection and the “Show All
Channel Frequencies” button functions are
disabled for Paragon
PD
as it uses a single
channel.
• A Test section, with a Ping button and the
relevant address field.
• A Status bar, for displaying standard user-
messages. Other messages appear in dialog
window boxes or warning windows.
• The RSSI Bar Graph on the right side of the
window is exclusive to Gemini
PD
and is dis-
abled when connected to Paragon
PD
.
4.4 Functions
The WinRIS program is used to:
• Save an existing configuration from a unit to
a file.
• Take a configuration from a file and upload
it to a unit
• Check Paragon
PD
’s transmit functions
• Test and/or trouble-shoot installations
4.4.1 “Station Reset” button
The Station Reset button is the only button
available when first starting the program and is
used to initiate the connection process.
• Press Station Reset.
• Enter Port and Baud rate information in the
Select Port sub-window.
Figure 17 - “Select Port” dialog window
• Press OK to validate the selection (or Can-
cel to exit back to the main screen).
• When connection is established, all test
buttons and fields valid for the product
identified are activated.
The Station Reset button is also pressed as a last
step after doing a “Put From”. The Station Reset
button causes downloaded parameters from a
file or diskette to take effect in the connected
unit.
Pressing Station Reset is not required after do-
ing any Comments or Password configuration
change as these have their own Put Comments
and Put Password buttons.
Station Reset does not break the connection.
4.4.2 Configuration to a file
Saving the unit’s configuration to a file allows
the user to: