
User's Manual
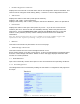

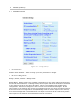
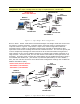

Table Of Contents
- 1 VIPER OVERVIEW
- 2 SYSTEM ARCHITECTURE AND NETWORK PLANNING
- 3 DATARADIO VIPER QUICK START
- 4 VIPER WEB MANAGEMENT
- 5 UNIT STATUS
- 6 SETUP (BASIC)
- 7 SETUP (ADVANCED)
- 7.1 RF OPTIMIZATIONS
- 7.2 IP SERVICES
- 7.3 IP ADDRESSING
- 7.4 IP OPTIMIZATION
- 7.5 IP ROUTING (TABLE/ENTRIES)
- 7.6 TIME SOURCE
- 7.7 ALARM REPORTING
- 7.8 USER SETTINGS
- 8 SECURITY
- 9 STATISTICS
- 10 MAINTENANCE
- 11 NEIGHBOR MANAGEMENT
- 12 NETWORK OPTIMIZATION
- 13 UPGRADING YOUR FIRMWARE
- VIPER SPECIFICATIONS
- PRODUCT WARRANTY
- DEFINITIONS

6 SETUP (BASIC)
6.1 GENERAL SETUP
Figure 6.1 - Setup (Basic)
Station Name
Station name identifier – Enter a string up to forty characters in length.
IP Forwarding Mode
Bridge / Router, Default = Bridge mode
Bridge Mode: Bridge mode is the simplest configuration for the Viper radio and should only
be used for small networks. In Bridge mode, all the Vipers and all the Hosts/PCs connected
to the Vipers must be on the same IP subnet. Figure 6.2 illustrates Viper bridge mode
configuration. Ethernet messages are sent over the air as broadcast messages. All the
other Vipers in the network will receive the message and relay it to their local area network.
If the Com Ports are configured for Serial/RF Bridge mode on all the Vipers in the network,
then each message that is transmitted into one Viper’s Com Port will be received by all the
other Vipers in the network and transmitted out their Com Ports.
001-5008-000(Rev8) Page 46