
User's Manual

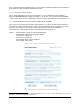
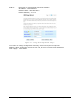
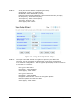
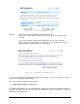
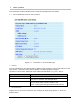

Table Of Contents
- 1 VIPER OVERVIEW
- 2 SYSTEM ARCHITECTURE AND NETWORK PLANNING
- 3 DATARADIO VIPER QUICK START
- 4 VIPER WEB MANAGEMENT
- 5 UNIT STATUS
- 6 SETUP (BASIC)
- 7 SETUP (ADVANCED)
- 7.1 RF OPTIMIZATIONS
- 7.2 IP SERVICES
- 7.3 IP ADDRESSING
- 7.4 IP OPTIMIZATION
- 7.5 IP ROUTING (TABLE/ENTRIES)
- 7.6 TIME SOURCE
- 7.7 ALARM REPORTING
- 7.8 USER SETTINGS
- 8 SECURITY
- 9 STATISTICS
- 10 MAINTENANCE
- 11 NEIGHBOR MANAGEMENT
- 12 NETWORK OPTIMIZATION
- 13 UPGRADING YOUR FIRMWARE
- VIPER SPECIFICATIONS
- PRODUCT WARRANTY
- DEFINITIONS

STEP 3: Verify FCC license before completing this step.
Channel ID: Enter 1 for Channel ID
Bandwidth: Enter Bandwidth (in KHz)
Data and Control Packet Bit Rate: Select desired bit rate (in kbps)
RX Frequency: Enter RX Frequency
TX Frequency: Enter TX Frequency
TX Power: Enter 5.0 W
Click “Apply” Click “Next”
Figure 3.8 - Using the Setup Wizard: Step 3
STEP 4: The Viper uses AES-128 bit encryption to protect your data from
intrusion. Use of encryption is optional but we strongly recommend
it for network configuration. The encryption phrase/key must be common
to all units in a network.
Encryption Disabled
Encryption: Click Disabled
Click “Apply”. Click “Next”.
Encryption Enabled
Encryption: Click Enabled
Encryption Pass Phrase: Enter an encryption phrase
Note this phrase for reference later
Click “Apply”. Click “Next”.
001-5008-000(Rev8) Page 35