
User's Manual
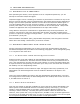

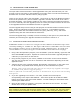
Table Of Contents
- 1 VIPER OVERVIEW
- 2 SYSTEM ARCHITECTURE AND NETWORK PLANNING
- 3 DATARADIO VIPER QUICK START
- 4 VIPER WEB MANAGEMENT
- 5 UNIT STATUS
- 6 SETUP (BASIC)
- 7 SETUP (ADVANCED)
- 7.1 RF OPTIMIZATIONS
- 7.2 IP SERVICES
- 7.3 IP ADDRESSING
- 7.4 IP OPTIMIZATION
- 7.5 IP ROUTING (TABLE/ENTRIES)
- 7.6 TIME SOURCE
- 7.7 ALARM REPORTING
- 7.8 USER SETTINGS
- 8 SECURITY
- 9 STATISTICS
- 10 MAINTENANCE
- 11 NEIGHBOR MANAGEMENT
- 12 NETWORK OPTIMIZATION
- 13 UPGRADING YOUR FIRMWARE
- VIPER SPECIFICATIONS
- PRODUCT WARRANTY
- DEFINITIONS

1
to
ection 13.1
3.2 UPGRADE RADIO FIRMWARE
If the radio firmware revision has been upgraded in the new package, follow these steps
complete the upgrade process.
1. First upgrade the Viper Modem Firmware as outlined in s
2. Telnet into the Viper or access the CLI (command line interface) through the serial port.
Example: Telnet using Windows Command Prompt program.
Open Windows Command Prompt. Type the following command then press enter:
telnet Viper_ip_address
Figure 13.1 - Use Windows Command Prompt to Telnet to Viper Radio.
You should see the following message in return:
imported successfully.
200-OK.
e following command, then press enter to verify the radio firmware is the most
You should see a message similar to this:
200-Radio Information
3. Enter in your username and password.
4. Type the following command then press enter:
radio.upload.firmware.binary –v –f vipr_radio.bin
100-Loading file "vipr_radio.bin"...
100-File
100-Entering flash programming mode...
100-Erasing flash...
100-Programming flash...
100-Restarting radio...
200 Done
Type th
recent:
radio.version
001-5008-000(Rev8) Page 116