
User's Manual

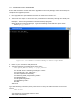
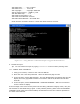
Table Of Contents
- 1 VIPER OVERVIEW
- 2 SYSTEM ARCHITECTURE AND NETWORK PLANNING
- 3 DATARADIO VIPER QUICK START
- 4 VIPER WEB MANAGEMENT
- 5 UNIT STATUS
- 6 SETUP (BASIC)
- 7 SETUP (ADVANCED)
- 7.1 RF OPTIMIZATIONS
- 7.2 IP SERVICES
- 7.3 IP ADDRESSING
- 7.4 IP OPTIMIZATION
- 7.5 IP ROUTING (TABLE/ENTRIES)
- 7.6 TIME SOURCE
- 7.7 ALARM REPORTING
- 7.8 USER SETTINGS
- 8 SECURITY
- 9 STATISTICS
- 10 MAINTENANCE
- 11 NEIGHBOR MANAGEMENT
- 12 NETWORK OPTIMIZATION
- 13 UPGRADING YOUR FIRMWARE
- VIPER SPECIFICATIONS
- PRODUCT WARRANTY
- DEFINITIONS

001-5008-000(Rev8) Page 115
1
1
3
3
U
U
P
P
G
G
R
R
A
A
D
D
I
I
N
N
G
G
Y
Y
O
O
U
U
R
R
F
F
I
I
R
R
M
M
W
W
A
A
R
R
E
E
The Viper radio modem firmware is field-upgradeable using the unit’s Ethernet port. The
process involves connecting to the IP address of the Viper from a host PC and transferring
firmware files via a Files Transfer Protocol (FTP) program.
There are two sets of code in the Viper Radio. The first set of code is the Modem Firmware
e is
pgrade process. It is likely the Radio Firmware will not have
to be upgraded each time the Modem Firmware is upgraded.
The first upgrade step involves using an FTP program to load the Modem Firmware into the
Viper. Do this by following the steps outlined in section 13.1. The Modem Firmware
package will contain the new Radio Firmware file (Viper_radio.bin), if any, and will be
uploaded along with the other Modem Firmware files.
The second upgrade step, if needed, involves connecting to the Viper’s CLI (command line
interface) and executing the upgrade command as outlined in section 13.2.
13.1 UPGRADE MODEM FIRMWARE PROCEDURE
WARNING: Firmware version 3.0 and greater must NOT be loaded into Viper units
currently running V1.x firmware. The Viper will not boot and will be unrecoverable
due to higher memory usage requirements of the added features. To verify your
current firmware version, navigate to Unit Identification and Status webpage.
1. Using a file decompression program, such as WinZIP™ (built into WinXP), right-click and
select the EXPAND TO option. Expand the contents of the firmware upgrade package to
a directory of your choice on the host PC.
2. Using an FTP program of your choice, establish a connection to the unit’s IP address.
The unit may prompt the user for a “Username” and “Password” depending of the FTP
application used.
3. Transfer all files in the upgrade package. Occasionally, long pauses, on the order of 30
to 45 seconds, are possible when storing the file in the unit’s flash file system.
Warning: Only transfer Dataradio Viper files. Do not transfer any zip folders that might
be included in the firmware upgrade package.
Failure to follow the recommended procedure as detailed above may result in unit becoming
unresponsive.
4. If you are upgrading from version 1.2 or older, transfer the license.opt file
corresponding to the Viper’s MAC Address. The license.opt file will enable the SNMP
feature and is tied to the Viper’s MAC Address. Contact CalAmp for information about
obtaining the SNMP feature.
5. Once the file transfer is complete, cycle power and allow the unit to boot. The Viper
should return to its pre-update state.
and must be updated every time a software upgrade is needed. The second set of cod
the Radio Firmware. This firmware resides on the Viper transceiver PC Board and requires
the user to manually start the u
Note:
After resetting, the Status LED should be steady green. If it is steady red, the FTP transfer
may not have been successful or the firmware is corrupt. See Verify File Integrity below.