
User's Manual
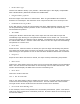
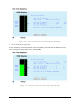
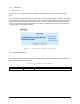
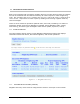
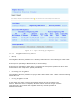
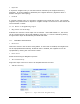
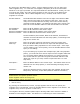
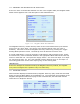
Table Of Contents
- 1 VIPER OVERVIEW
- 2 SYSTEM ARCHITECTURE AND NETWORK PLANNING
- 3 DATARADIO VIPER QUICK START
- 4 VIPER WEB MANAGEMENT
- 5 UNIT STATUS
- 6 SETUP (BASIC)
- 7 SETUP (ADVANCED)
- 7.1 RF OPTIMIZATIONS
- 7.2 IP SERVICES
- 7.3 IP ADDRESSING
- 7.4 IP OPTIMIZATION
- 7.5 IP ROUTING (TABLE/ENTRIES)
- 7.6 TIME SOURCE
- 7.7 ALARM REPORTING
- 7.8 USER SETTINGS
- 8 SECURITY
- 9 STATISTICS
- 10 MAINTENANCE
- 11 NEIGHBOR MANAGEMENT
- 12 NETWORK OPTIMIZATION
- 13 UPGRADING YOUR FIRMWARE
- VIPER SPECIFICATIONS
- PRODUCT WARRANTY
- DEFINITIONS

001-5008-000(Rev8) Page 109
By clicking the “Add Static Entry” button, a popup appears and the user can add a new
static neighbor entry. To create the new neighbor, completely fill in all the information
e user
tatic Neighbor entry is created, all IP routes to that
neighbor are created.
RF MAC Address: The default RF MAC address is the last six digits of the Ethernet MAC
ing the Setup (Basic) D IP Settings web page of the remote unit.
Enter the current RF MAC address of the remote radio into this field.
RF IP Address: Enter the RF IP address of the remote Viper.
F netmask of the remote Viper.
Ethernet IP Address: Enter the Ethernet IP address of the remote Viper.
et IP Address, and Ethernet
netmask can all be obtained from the Setup (Basic) D IP Settings web
page of the remote unit.
Hop Count: Enter the number of RF hops required to reach the remote Viper.
Enter the RF MAC address of the next Viper that data packets must
first go to before being repeated on to the remote Viper. If the Viper
e
If you are setting up a system with multiple hops (with relay/repeater
points), you must first enter remote Vipers into the neighbor table that
are 1 hop away before adding Vipers that are 2 or more hops away.
iper will recognize the RF MAC address of the
“Next Hop” Viper as you setup routes to Vipers that are 2 or more
ps away.
e Station Name can be
obtained from the Setup (Basic) D General Settings web page of the
mote unit.
Attributes: Check the attributes that the remote Viper has enabled: Access Point,
Relay Point, TCP Proxy, and/or NAT (Network Address Translation).
asked for in the pop-up window. The requested fields are described below. Finally, th
must press the “Apply” and “Save Config” buttons for the new entry to be added to the
network Routing Table. When a S
that is found on the label on the bottom of the Viper. Also you can
verify the current RF MAC that is being used in the remote radio by
check
RF netmask: Enter the R
Ethernet netmask: Enter the Ethernet netmask of the remote Viper.
The RF IP address, RF netmask, Ethern
Next Hop:
you are adding is only one hop away, enter the RF MAC address of th
Viper you are adding.
This insures that the V
ho
Description: Enter the Station Name of the remote Viper. Th
re
NOTE:
Static Entries can replace dynamic entries.
Static neighbor entries do not age out.
Static neighbor entries are stored even when neighbor discovery is disabled.
Delete Entry
By pressing the “Delete Entry” button, a popup appears and the user can specify the
neighbor entry to be deleted. Enter the RF MAC address of the neighbor to be deleted. The
neighbor entry can be a dynamic or static entry.
The neighbor discovery tries are added or
deleted from the Neighbor Table. See Section 7.5: IP Routing for more information.
module updates Viper’s Routing Table when en