
User's Manual
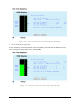
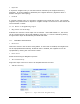
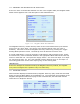
Table Of Contents
- 1 VIPER OVERVIEW
- 2 SYSTEM ARCHITECTURE AND NETWORK PLANNING
- 3 DATARADIO VIPER QUICK START
- 4 VIPER WEB MANAGEMENT
- 5 UNIT STATUS
- 6 SETUP (BASIC)
- 7 SETUP (ADVANCED)
- 7.1 RF OPTIMIZATIONS
- 7.2 IP SERVICES
- 7.3 IP ADDRESSING
- 7.4 IP OPTIMIZATION
- 7.5 IP ROUTING (TABLE/ENTRIES)
- 7.6 TIME SOURCE
- 7.7 ALARM REPORTING
- 7.8 USER SETTINGS
- 8 SECURITY
- 9 STATISTICS
- 10 MAINTENANCE
- 11 NEIGHBOR MANAGEMENT
- 12 NETWORK OPTIMIZATION
- 13 UPGRADING YOUR FIRMWARE
- VIPER SPECIFICATIONS
- PRODUCT WARRANTY
- DEFINITIONS

001-5008-000(Rev8) Page 101
Packet data type
Choose from ASCII or Binary (Hex) formats. ASCII data type is also highly compressible.
nter the length of the data to be transmitted. Note: A typical SCADA value would be
between 10 to 250 bytes. The maximum value is equal to the MTU set in each Viper unit.
Lock PTT between packets
If the "Off" option is chosen and enough delay has been added between packets, the Viper
will stop transmitting between packets. If "On" is selected the Viper will continuously
transmit between packets.
Test Mode
Clicking the "Enable" radio button will put the Viper into test mode and the Viper will
immediately begin listening for test packets transmitted from a remote unit. As the unit
receives test packets, the statistics will be updated. The statistics can be viewed by clicking
the "Show Stats" button. Click the "Start Test" button to have the Viper start transmitting
test packets to a remote unit.
Start Test
Starts the test. When this button is clicked, the Viper will begin transmitting test packets.
The “Start Test” button does not need to be clicked on the receiving Viper. The Viper will
start listening for test packets as soon as the Test Mode “Enabled” radio button is selected.
Stop Test
tops the test. When this button is clicked, the Viper will stop transmitting test packets.
l cause a pop up window that displays the test statistics.
Note: The user should use this feature on the receiving unit to monitor the Net test. This
n to display the test results. A typical results page with the
results from the transmitting Viper is shown below. The left column lists current results.
000 packets were successfully transmitted. (Note: This doesn’t
imply how many packets were successfully received. Check the stats on the receiving Viper
Note: Random Binary data best simulates PLC SCADA data.
Length of data payload
E
S
Show Stats
Clicking the "Show Stats" button wil
window will also display the RSSI value from the transmitting unit.
Clear Stats
Clears the results of the test.
10.4.2 Net Test Results
Click on the “Show Stats” butto
The right column shows results from the last time the stats were refreshed.
Stats from Transmitting Unit
In this example, 1000 of 1
for this information.)