
User Manual
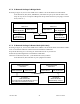
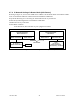


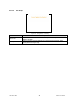

Table Of Contents
- 1.
- 1. Product Overview
- 2. Installation
- 3. Physical Description
- 4. Operation & Configuration
- 4.1 Browser-Based Setup and Status
- 4.2 LAN Setup
- 4.3 Login Screen
- 4.4 Interface
- 4.5 Setup Wizard (Bridge Mode)
- 4.6 Default IP Settings
- 4.7 IP Network Settings
- 4.8 Advanced IP Settings
- 5. Optimization & Troubleshooting
- 6. Specifications

120 40520-100a ViPR User Manual
32
4.6 Default IP Settings
• Default RF mode is Remote
• Default IP Forwarding mode is Bridge
• Time Division Duplex (TDD) RF protocol is enabled by default
4.6.1 Ethernet Interface
• MAC: 00:0A:99:XX:YY:ZZ
• IP ADDR: 192.168.204.1
• NETMASK: 255.255.255.0
• Default Gateway: 0.0.0.0
• DHCP Server Enabled
4.6.2 RF Interface
• MAC: 00:XX:YY:ZZ
• IP ADDR: 10.XX.YY.ZZ
• NETMASK: 255.0.0.0
• TCP Proxy Disabled
Notes:
RF Interface IP settings are irrelevant in bridge mode.
XX:YY:ZZ refer to lower three bytes of Ethernet MAC address
4.7 IP Network Settings
For Advanced IP Settings, web interface screen captures, and descriptions, see section 4.8.
4.7.1 Factory Settings in Bridge Mode
Referring to Figure 19, set one of the ViPR unit as a Master for a basic transparent Bridge network.
In the illustration, Host and RTU are part of the same IP subnet and IP addresses of ViPR units
are irrelevant in transparent Bridge mode setup.
Figure 19 - Factory IP Network Settings in transparent Bridge Mode with no services
ViPR Master
DHCP Server
Eth1 IP: 192.168.204.1
MASK: 255.255.255.0
Compression
Encr
y
ption
ViPR Remote
DHCP Server
Compression
Encr
y
ption
Eth1 IP: 192.168.204.1
MASK: 255.255.255.0
RF Network
Host
IP: 172.30.1.1
MASK: 255.255.255.0
RTU
IP: 172.30.1.2
MASK: 255.255.255.0