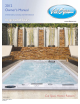
LTR20121002, Rev.
Preparing for Your New Inground Spa Inground Spa Installation Checklist . . . . . . 4 Diverter Knobs . . . . . . . . . . . . . . . . . . . . . . 29 Clear Water Plan Planning the Best Location For Your Spa . . 4 The Key to Clear Water . . . . . . . . . . . . . . . 30 Planning the Best Place for the Outdoor Equipment Pack . . . . . . . . . . . . . . . . . . . . . . 5 Testing and Adjusting Spa Water . . . . . . .
Important Safety Instructions 104˚F (40˚C) are considered safe for a healthy adult. Lower water temperatures are recommended for young children and when spa use exceeds 10 minutes. READ AND FOLLOW ALL INSTRUCTIONS NOTE: A licensed electrician may be required to upgrade your standard receptacle and/or circuit breaker. High water temperatures have a high potential for causing fetal damage during pregnancy.
Preparing for Your New Inground Spa 4 Preparing for Your New Inground Spa Most cities and counties require permits for exterior construction and electrical circuits. In addition, some communities have codes requiring residential barriers such as fencing and/or self-closing gates on property to prevent unsupervised access to the property by children. Your dealer can provide information on which permits may be required and how to obtain them prior to the delivery of your Cal Spa.
Planning the Best Place for the Outdoor Equipment Pack • The equipment pack must be located within a maximum of 15 feet from the spa. • Ensure the equipment running its normal filtration cycles does not make too much noise for spa owners and/or neighbors. • Ensure the equipment can be easily serviced for filter cleaning and periodic inspections in the location chosen. • If you are using a gas heater, you will need to consider wind and drafts as well as heater exhaust for proper heater placement.
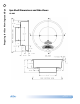
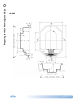
Preparing for Your New Inground Spa 6 Spa Shell Dimensions and Side Views IG-401 Inground Spas www.calspas.com LTR20121002, Rev.
Preparing for Your New Inground Spa IG-402 Inground Spas LTR20121002, Rev. A www.calspas.
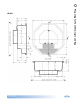
Preparing for Your New Inground Spa 8 IG-403 Inground Spas www.calspas.com LTR20121002, Rev.
Preparing for Your New Inground Spa IG-404 Inground Spas LTR20121002, Rev. A www.calspas.
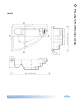
Preparing for Your New Inground Spa 10 IG-405 Inground Spas www.calspas.com LTR20121002, Rev.
Preparing for Your New Inground Spa IG-406 Inground Spas LTR20121002, Rev. A www.calspas.
Preparing for Your New Inground Spa 12 IG-407 Inground Spas www.calspas.com LTR20121002, Rev.
All 240V spas must be permanently connected (hard wired) to the power supply. These instructions describe the only acceptable electrical wiring procedure. Spas wired in any other way will void your warranty and may result in serious injury. See the wiring diagram on page 14. When installed in the United States, the electrical wiring of this spa must meet the requirements of National Electric Code, ANSI/NFPA 70-2008 and any applicable local, state, and federal codes.
Preparing for Your New Inground Spa 14 GFCI Wiring Diagram Inground Spas www.calspas.com LTR20121002, Rev.
All 230V spas must be permanently connected (hard wired) to the power supply. These instructions describe the only acceptable electrical wiring procedure. Spas wired in any other way will void your warranty and may result in serious injury. Wire runs over 85 feet must increase wire gauge to the next lower number. For example: A normal 50 amp RCD with four #8 AWG copper wires run over 85 feet would require you to go to four #6 AWG copper wires. This the only acceptable electrical wiring procedure.
Preparing for Your New Inground Spa 16 RCD Wiring Diagram GREEN/ YELLOW (Ground) GREEN/ YELLOW (Ground) CIRCUIT BOARD GREEN/ YELLOW (Ground) Inground Spas www.calspas.com LTR20121002, Rev.
Preparing for Your New Inground Spa Installing the Inground Shell Inground Spas LTR20121002, Rev. A www.calspas.
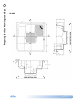
Preparing for Your New Inground Spa 18 Equipment Pack Plumbing Connections Equipment Pack Specifications All Inground spas except IGJ-407: Equipment pack weight = 250 lbs. IGJ-407: Equipment pack weight = 300 lbs. One 2.5 HP heat pump One 4 HP swim pump Note: Equipment pack cannot exceed 15 feet from spa. Plumbing Connections IMPORTANT! Always check local codes prior to any inground spa installation. Once the spa and equipment are properly located, you will want to lay out the plumbing run.
The use of gate valves is recommended on all plumbing lines (both suction and return lines). These valves are used to contain the spa’s water in either the equipment or the spa. This will assist in the pump priming process and future servicing without needing to drain the spa. NOTE: When draining the spa to perform maintenance, always close the gate valves prior to draining. This will maintain the pumps prime.
Preparing for Your New Inground Spa 20 Electrical and Electronic Connection Remote Equipment Topside Control Panel The next few steps to complete the installation should be performed along with installation of the temperature sensor and 12V spa light wiring (if applicable). All of these components are generally installed using the same conduit. 1. Locate the topside control panel extension loom in the control box mounted with the equipment pack.
On spas ordered with inground lights, the factory installs the light niche for you. The next steps of installation should be performed by a qualified licensed electrician. Always read and follow light manufacturer’s safety and installation instructions prior to installation and operation. Incorrect installation may damage the light and void its warranty. The light circuit must be on a GFCI protected service (alone or with a switch).
Preparing for Your New Inground Spa 22 Inground Spas www.calspas.com LTR20121002, Rev.
It is recommended that all electrical hook ups and all plumbing be completed before pouring the concrete. Make certain all electrical inspections on lights, bonding and all other electrical work have been completed and checked off by the local inspectors prior to proceeding with your concrete or finish work. It is a good idea to run the spa for at least 24 hours before pouring the concrete to insure there are no leaks.
Operating Your Spa 24 9800 Electronic Control Operation Initial Start-up When first powered up, your spa will perform a self-diagnostic check and then automatically go into priming mode. The topside will display PR to indicate this. Priming mode will be active for less than five minutes. When the spa has finished priming, the heater will be activated and the water temperature will be maintained in standard mode. The spa will automatically heat to 100°F (37.
• The first filter cycle is automatically activated at 8:00 AM and operates the pump until 10:00 AM. The “FILTER 1” indicator icon will light when filter 1 is running. • The second filter cycle is automatically activated at 8:00 PM and operates the pump until 10:00 PM. The “FILTER 2” indicator icon will light when filter 2 is running. Light Press the “LIGHT” button to turn the spa light on and off and to shift between dim and bright settings if your light is dimmable.
Operating Your Spa 26 Periodic Reminder Messages Press the “Mode” button to reset a displayed reminder. Message rPH rSA rCL rtg Frequency Action Required Every 7 days Test and adjust chemical levels per manufacturer’s instructions. Every 7 days Test and adjust chemical levels per manufacturer’s instructions. Every 30 days Remove, clean, and reinstall filter per manufacturer’s instructions. Every 30 days Test and reset GFCI per manufacturer’s instructions.
Message Meaning No message 1) Spa temperature is unknown. on display Action Required 1) After pump has been running for 2 minutes temperature will be displayed. 2) Spa is in Economy or Sleep mode. 2) In Economy or Sleep mode, the pump may be off for hours outside a filter cycle. If you wish to see the current spa temperature, either switch to Standard mode or turn Jets1 on for at least two minutes. 3) Power has been cut off to the spa. 3) The control panel will be disabled until power returns.
Operating Your Spa 28 Message Meaning Action Required HH OHH Overheat protection (spa is shutdown). One sensor has detected 118˚F (48˚C) at the heater. DO NOT ENTER THE WATER! Pr When your spa is first actuated, it The priming mode will last for up to four minutes and will go into priming mode. then the spa will begin to heat and maintain the water temperature in the Standard mode. SF Safety Suction. Spa is shut down. SL Indicates heater is in Sleep Mode. None. SA Sb SNA Snb Spa is shut down.
Diverter Knobs Almost all of the jets in your spa are adjustable. Rotating the face of an adjustable jet to the left (counter-clockwise) will decrease the amount of water flow through the jet. Rotating the face of an adjustable jet to the right (clockwise) will increase the amount of water flow through the jet. Diverter knobs are 1” and 2” knobs located around the top of your spa.
Clear Water Plan Contents of this section: Testing and Adjusting Spa Water Sanitation Filtration Bather Load Starting the Spa with Fresh Water Maintenance Schedule Troubleshooting Water Clarity Problems This section is intended for new spa owners with no experience with water chemistry. Everyone’s experience with maintaining water quality is different, but there are some general concepts you need to know. Water maintenance is not difficult, although it requires regular attention.
You have two types of testing methods to choose from: • The reagent test kit is a method which provides a high level of accuracy. It is available in either liquid or tablet form. • Test strips are a convenient testing method commonly used by spa owners. Balancing the Total Alkalinity Balancing the Calcium Hardness Total alkalinity (TA) is the measure of the total levels of carbonates, bicarbonates, hydroxides, and other alkaline substances in the water. TA can be considered a “pH buffer”.
Clear Water Plan 32 Sanitation After you fill your spa, you need to decide which chemical sanitizer you wish to use. Consult your Cal Spas dealer for the right decision with regards to your lifestyle and spa usage. We recommend either bromine or chlorine as your sanitizer. Both work well when maintained regularly. DO NOT use trichlor. Trichlor is very acidic and the hot temperature of the spa causes it to dissolve too quickly. It will cause damage to your spa and will void your warranty.
In addition to using a chemical sanitizer, you will periodically need to shock the water. Shocking the water helps remove burned-out chemicals, bacteria, and other organic material from your spa’s water and improves your sanitizer’s effectiveness. Do not use chlorinating shock, which will damage your spa’s jets and pump seals. Only use an oxidizer shock. It can be used with either chlorine or bromine sanitizers.
Clear Water Plan 34 Bather Load “Bather Load” is the term used to describe the number of people using a spa, combined with the length of usage, and the frequency of usage. All these factors have a great effect on the spa water. The higher the bather load, the more chemicals need to be added and a longer filtration time will be needed.
Each time you refill the spa Follow the section “Starting the Spa with Fresh Water”. Prior to each use Test the spa water using either test strips a reagent test kit. Adjust chemical levels as necessary. Once a week Test the spa water using either test strips a reagent test kit. Adjust chemical levels as necessary. Once a month Deep clean your spa’s filter.
Cleaning and Maintenance 36 Cleaning and Maintenance Removing and Reseating the Pillows You can remove the pillows for cleaning and maintenance quickly and easily. This method works for all types of pillows. Grab the lower edge of the pillow with both hands firmly and pull up. As you do this, the pillow inserts will pop out of the holes. Reseat the pillows by aligning the pillow inserts with the holes and striking the pillow hard enough to insert the pegs back into the holes.
Your spa should be drained every four to six months, and refilled with fresh tap water. The following is the recommended method for draining your spa. 1. Turn off the power at the breaker. 2. Remove all filters. 3. Hook up the female end of a garden hose to the drain fitting (if equipped). 4. Place the other end of the garden hose where you would like the water to drain to. 5. Let spa drain completely, then remove garden hose and refill.
Cleaning and Maintenance 38 Cleaning Your Spa Spa Cover and Pillows Due to the constant punishment your spa cover and pillows receive, you should protect them by applying a vinyl and leather cleaner as part of your monthly maintenance plan. Use a product that is specifically designed to protect spa covers and pillows from chemical and ultraviolet light damage without leaving an oily residue behind that is normally associated with common automotive vinyl protectants.
Appendix Appendix Replacement Parts Lights Jets ELE 2” Euro No Eyeball Light Inground 100W 120V 30’ PLU282050W LIT16000100 mfc 3” Directional Walfitting, Clear Lens Cap, Jumbo Spa Light, 5” PLU283050W LIT16100153 PSR 5” Rim Red Lens Insert, Jumbo Spa Light PLU285052W LIT16100155 Blue Lens Insert, Jumbo Spa Light LIT16100156 SW Swim Standard face PLU21700565 Covers Deluxe Rust Deluxe Gray Deluxe Slate Deluxe Palomino Deluxe Teal Deluxe Navy Deluxe Hunter DIJ-401 93” Round ACU02200310
LMS Customer Service Department 1462 East Ninth Street Pomona, CA 91766 Toll Free: 1-800-CAL-SPAS Fax: 1-909-629-3890 www.calspas.com LTR20121002, Rev.