INSTALLATION INSTRUCTIONS 16 Installation Instructions Refrigerator Questions? Visit our Website al: cafeapplisnces.com in Canada, visit noncompliance BEFORE YOU BEGIN Read these Instructions completely and carefully. « IMPORTANT —observe at governing codes and ordinances. Save these instructions for local inspector's use. + Mote to Installer ~ Be sure to leave these instructions with the Consumer. + Note to Consumer ~ Keep these instructions for future reference.
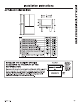
Installation Instructions APPLIANCE DIMENSIONS | Il ACCORDING TO THE WIDTH OF THE REFRIGERATOR Measure width of cabinet opening where refrigerator will be placed, B. Be sure fo account for any counter lop overhang, baseboard thickness and any clearance desired. Width, B, should not bs less than 337-367 {83.3 em 81.4 em) {depending on mode]. The refrigerator will be placed approximately in the middies of this opening.
INSTALLATION INSTRUCTIONS 18 Installation Instructions INSTALLING THE REFRIGERATOR REFRIGERATOR LOCATION = Do not install the refrigerator where the temperature will go below 80°F (18°C) because it will not run often enough to maintain proper tempera hires, = Do not install the refrigerator where the temperature will go above 100°F (37°C) because it will not perform properly. = Do not install the refrigerator in 2 location exposed to water {rain, etc.) or direct sunlight.
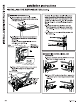
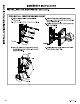
Installation Instructions INSTALLING THE REFRIGERATOR (Cont) REMOVING FRENCH DOORS IMPORTANT NOTES When removing french doors: + Read the instructions all the way through before starting » Handles are included inside the refrigerator. + Place the screws by their related parts to avoid using them in the wrong places. + Provide a non-scratching work surface for the doors. CAUTION FETTUCCINE Single person sift can cause injury.
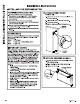
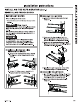
INSTALLATION INSTRUCTIONS 20 Installation Instructions INSTALLING THE REFRIGERATOR (Cont) [2] REMOVING LEFT DOOR {cont.) B. Remove the hinge cover on top of the left fresh food door by removing the screw using a Phillips screwdriver. ©. Unplug the 3 wire connectors and move the wires until you can see the screws holding the hinge. For ice and Water Models Only: Pull the water line very carefully. / Water Line {lea and Water Models Only) Wire Connectors D.
Installation Instructions INSTALLING THE REFRIGERATOR (Cont) REINSTALLING FRENCH DOORS IMPORTANT NOTES When replacing the french doors: « Read the instructions all the way through before starting. Lifting Hazard, Single person lift can cause injury. Use assistance when handling, moving or lifting the refrigerator dears. NOTE: When moving door, to prevent damage io door and electronics carefully place the door in a proper location.
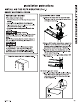
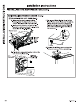
INSTALLATION INSTRUCTIONS 22 Installation Instructions INSTALLING THE REFRIGERATOR (Cont) REINSTALLING FRENCH DOORS (Cont) [3] REHANGING THE LEFT DOOR (Cont) €. Make sure the door is aligned with the F. For ice and Water Models Only: Put the cabinet. Attach the hinge to the top of the water line into the hole and pass through the cabinet loosely with bolts removed earlier. plastic port to the back of the refrigerator. D.
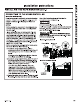
Installation Instructions INSTALLING THE REFRIGERATOR (Cont) REMOVING FREEZER DRAWER IMPORTANT NOTES When removing freezer drawer: * Read the instructions all the way through before starting. * Provide a non-scratching work surface for the doors. [fl REMOVE THE BASKETS A. Open the freezer drawer unt! it stops. B. Pull the top basket out until it stops. Lift the basket up on the front and out to remove. €. The lower basket rests on a frame inside the freezer drawer.
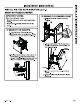
INSTALLATION INSTRUCTIONS 24 Installation Instructions INSTALLING THE REFRIGERATOR (Cont) [EI REINSTALL FREEZER DRAWER FRONT A. Pull the rail assemblies to the maximum B. Lower the front end of the freezer drawer extension. assembly so the side tabs fit info the front slots B. Locate the slots on the inside of each slide. on the rail assemblies. E. Replace the safety screws in both sides of the slide assemblies. €. Insert the hooks on the er xis of the drawer F.
Installation Instructions INSTALLING THE REFRIGERATOR (Cont) CONNECTING TO THE HOUSE WATER LINE {ice maker models only) A cold water supply is required for automatic makeover One of the illustrations below will look like the operation. if there is net a cold water supply, you will connection on your refrigerator. need to provide one. See Installing the Water Line sexton ESE NOTES: Connect to potable water supply only.
INSTALLATION INSTRUCTIONS 26 Installation Instructions INSTALLING THE REFRIGERATOR (Cont) TURN ON THE WATER SUPPLY {ice maker models only) Tum the water on at the shutoff naive (houses wale supply) and check for any leaks. PLUG IN THE REFRIGERATOR On models with an ice maker, before plugging in the refrigerator, make sure the malice power switch is set fo the 0 {off} position. See the grounding information attached to the power cord.
INSTALLATION INSTRUCTIONS 28 Installation Instructions INSTALLING THE WATER LINE BEFORE YOU BEGIN If the water supply to the refrigerator is from a Reverse Osmosis Water Filtration System (RO) AND the refrigerator also has a water filter, use the refrigerator's filter bypass plug. Using the refrigerators water filtration cartridge in conjunction with an RO water filter can result in hollow lee cubes. Some models do not come equipped with the filter bypass plug.
Installation Instructions INSTALLING THE WATER LINE (Cont) WHAT YOU WILL NEED (Cont) NOTE: The only Crowley approved plastic tubing is that supplied in Universal Water Line Refrigerator Tubing Kits. Do not use any other plastic water supply line because the line is under pressure at all times. Certain types of plastic will crack or rupture with age and cause water damage fo your home.