
Operating instructions


INSTALLATION INSTRUCTIONS (continued)
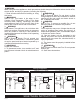
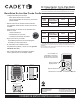
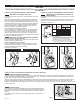
Correct 240 Volt Conguration Correct 120 Volt Conguration
R
E
S
E
T
R
E
S
E
T
DO NOT DISCONNECT THE YELLOW TERMINAL
AT THE “A” LOCATION
(1) Remove and cut BLUE (C) terminal from wire harness
and wrap cut loose wire end with electrical tape.
Move remaining YELLOW (B) terminal to the BLUE (C)
terminal location.
(2) Cut BLUE (C) terminal from wire harness and wrap
loose wire end with electrical tape.
BLUE
C
YELLOW
B
YELLOW
A
YOUR WIRES WILL BE
CONFIGURED LIKE THIS
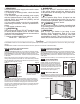
VOLTAGE
240V
208V
IF YOUR
DESIRED
WATTAGE IS:
1300
800
500
975
600
375
YELLOW
1
YELLOW
YELLOW
1
YELLOW
BLUE
YELLOW
2
BLUE
YELLOW
2
UPPER
ELEMENT B
LOWER
ELEMENT C
White Wire
Black Wire
Blue Wire
Red Wire
White Wire
Black Wire
Blue Wire
Red Wire
Heater must be connected to a GFCI protected branch circuit.
Refer to wiring diagrams, and Figure 6 for desired voltage. Before
installing the heater, it is extremely important you verify the heater
is congured for the correct supply voltage. The Multi-Volt Com-
Pak Bathroom Heater is congured for 240-Volt operation by
default. For 120-Volt installation you must recongure the heater
wiring. Installing the heater without conguring for the correct
voltage will destroy the heater and void your warranty.
How to determine the supply voltage:
If replacing an existing heater, check the labels of the old heater
and replace using same voltage. For new construction, heater
wires must be congured to the same voltage as the supply wires.
If you need assistance, consult a qualied electrician.
Select Proper Heater Voltage
STEP 2
For 240-Volt conguration:
The Multi-Volt Com-Pak Bathroom Heater is congured for 240-
Volt operation by default.
For 120-Volt Conguration:
To congure heater for 120-Volt, disconnect the blue wire from
terminal D and connect it to terminal A. Then connect the loose
red wire to terminal D.
__________________________
Part Two
__________________________
After you have followed all instructions in PART ONE you are ready to install the heater assembly.
How do I insert the heater assembly into the wall can?
Install Heater Assembly
STEP 3
Install Grill
STEP 4
Secure grill with the screws provided. Slide thermostat knob onto
right control shaft extending through the grill and the timer knob
onto the left shaft. Turn power on at the electrical panel board.
Warranty is void if any material is sprayed on the element or blow-
er. Use a paint mask to cover any exposed areas of the heater if
walls are to be textured or painted.
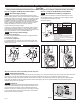
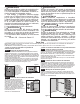
Turn heater assembly upside down (element down with motor facing you). Connect the supply wires to the heater wires with connectors
(See Figures 7 and 8). Now rotate the heater so the element and the fan are facing you. The element should be at the top.
Insert the bottom edge of the heater assembly into the half round slots in the bottom lip of the wall can (See Figure 9). [IMPORTANT:
Push wires into bottom of wall can during insertion. Be sure that supply wires are not caught between motor and wall can.] Attach
assembly at top with screw provided.
Figure 5
Figure 7 Multi-Volt
(Model CB103 shown)
Figure 8 Multi-Watt
(Model CB132 shown)
Figure 9
How do I congure the Multi-Volt model CB103? How do I congure the Multi-Watt model CB132?
Determine Supply Voltage
STEP 1
Multi-Watt Element Wiring Conguration
STEP 1
Heater must be connected to a GFCI protected branch circuit.
Use the table in Figure 5 to select the correct wattage required,
and the element terminals to be used.
Proceed to STEP 3.
Figure 6
Page 4
A
B
C
D
A
B
C
D