
Installation Sheet
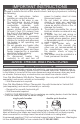


WARRANTY
For more eective and safer operation and to prolong the
life of the heater, read the Owner’s Guide and follow the
instructions. Failure to properly maintain the heater will
void any warranty and may cause the heater to function
improperly.
LIMITED THREE YEAR WARRANTY: Cadet will repair
or replace any Com-Pak Max (CM) heater found to be
defective within three years after the date of purchase.
These warranties do not apply:
1. Damage occurs to the product through improper
installation or incorrect supply voltage;
2. Damage occurs to the product through improper
maintenance, misuse, abuse, accident, or alteration;
3. The use of unauthorized accessories or unauthorized
components constitutes an alteration and voids all
warranties. Refer to Cadet website or call customer
service at 855.223.3887 or 360.693.2505 for list of
authorized accessories and components.
4. Cadet’s warranty is limited to repair or replacement.
5. In the event Cadet elects to replace any part of your
Cadet product, the replacement parts are subject to
the same warranties as the product. The installation
of replacement parts does not modify or extend the
underlying warranties. Replacement or repair of
any Cadet product or part does not create any new
warranties.
If you believe your Cadet product is defective, please
contact Cadet during the warranty period, for instructions
on how to have the repair or replacement processed.
Parts and Service
Visit cadetheat.com/parts-service for information on
where to obtain parts and service.
To register your product, visit cadetheat.com/product-registration
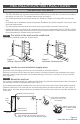
INTERNAL HEATER WIRING DIAGRAMS
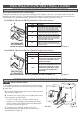
1. Make sure all wires are properly
connected and installation is com-
plete before you turn on the heater.
2. Do not operate without grill.
3. Do not tamper with the high-
temperature safety shuto.
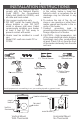
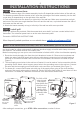
OPERATING INSTRUCTIONS
7
Complete installation
After installation, turn your thermostat to the highest setting and let the heater run for 30 minutes.
Some smoking may occur as the element initially burns o residue from manufacturing.
If your heater shows signs of overheating, such as glowing red or repeatedly getting unusually hot and
shutting o, immediately turn o the circuit breaker and review the “KNOW YOUR VOLTAGE” section
or call us.
If the high-temperature safety shuto trips more than once a day, replace the heater.
WITH BUILT-IN THERMOSTAT
WITHOUT THERMOSTAT
How to operate your heater
The room temperature is controlled by a thermostat located either on the wall, or on the heater. Once
installation is complete and power is on, follow the steps below for your thermostat.
If you have a wall or built-in thermostat with a knob:
1. Turn the thermostat knob all the way to the right.
2. When the room reaches your comfort level, turn the knob to the left, just until it clicks and the
heater turns o. The heater will automatically keep the room temperature around this setting.
3. To reduce the room temperature, turn the knob to the left. To increase the room temperature,
turn the knob to the right.
If you have an electronic wall thermostat, follow the instructions in the programming and operating
guide included with your thermostat.
TERMOSTATO OPCIONAL
DE UN SOLO POLO
INTERRUPTOR
LIMITE DE ALTA
TEMPERATURE
DE REGLAJE
MANUAL
RESET
HIGH TEMP
LIMIT
A
C
B
HEATING ELEMENT
MOTOR
L1 L2
OPTIONAL
SINGLE POLE
THERMOSTAT
1
3
D
A
C
B
ELEMENTO CALENTADOR
MOTOR
L1 L2
1
3
D
MANUAL
RESET
HIGH TEMP
LIMIT
HEATING ELEMENT
MOTOR
L1 L2
FOR USE WITH
WALL MOUNTED
THERMOSTAT
C
B
D
TERMOSTATO OPCIONAL
DE UN SOLO POLO
INTERRUPTOR
LIMITE DE ALTA
TEMPERATURE
DE REGLAJE
MANUAL
RESET
HIGH TEMP
LIMIT
C
B
HEATING ELEMENT
MOTOR
L1 L2
OPTIONAL
SINGLE POLE
THERMOSTAT
1
3
D
A
C
B
ELEMENTO CALENTADOR
MOTOR
L1 L2
1
3
D
MANUAL
RESET
HIGH TEMP
LIMIT
HEATING ELEMENT
MOTOR
L1 L2
FOR USE WITH
WALL MOUNTED
THERMOSTAT
A
C
B
D
Com-Pak Max Models
CM152T and CM158T
Com-Pak Max Models
CM152 and CM158
Com-Pak Max Models
CM192T and CM198T
Com-Pak Max Models
CM192 and CM198