
Installation Sheet
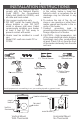


TOOLS REQUIRED
Tape Measure
Straight and Phillips
Screwdrivers1½" Wood ScrewsWire Strippers Wire Connectors
½" Cable Clamp
Connector
Volt Meter
Drill and Drill Bits
Stud Finder
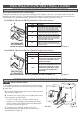
A multi-purpose tool or something to cut your existing drywall or gypsum board.
Z
I
R
C
O
N
®
®
Z
I
R
C
O
N
®
®
Z
I
R
C
O
N
®®
Z
I
R
C
O
N
®
®
Z
I
R
C
O
N
®®
Z
I
R
C
O
N
®
®
Hammer
Z
I
R
C
O
N
®
®
Z
I
R
C
O
N
®®
Z
I
R
C
O
N
®
®
Z
I
R
C
O
N
®®
INSTALLATION INSTRUCTIONS
1. All electrical work and materials must
comply with the National Electric
Code (NEC), the Occupational
Safety and Health Act (OSHA), and
all state and local codes.
2. Use copper conductors only.
3. DO NOT install the heater directly
above bathtub or sink. DO NOT
install in shower stall area. Cadet
recommends installing your heater
at least 2 feet (61 cm) away to
prevent contact with water.
4. Heater must be installed in a wall
can:
Model CM - wall can model CC or
CCSM
5. DO NOT install the heater in a floor,
in the ceiling, below a towel bar,
behind a door, or anywhere the air
discharge may be blocked in any
manner.
6. To reduce the risk of fire, do not
store or use gasoline or other flam-
mable vapors and liquids in the vi-
cinity of the heater.
7. Connect grounding lead to
grounding screw provided. Keep all
foreign objects out of heater.
8. CAUTION – High temperature, risk
of fire, keep electrical cords, drapery,
furnishings and other combustibles
at least 3 feet (0.9 m) from the front
of the heater and away from the side
and rear.
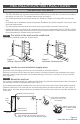
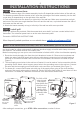
PARTS OF YOUR HEATER
built-in
thermostat
heater element
fan and
motor
3
Vertical Mount
With Thermostat
Horizontal Mount
No Thermostat
reset
button
reset button
fan and
motor