
Cut Sheet

Installation Instructions (continued)
Warranty
SAVE THESE INSTRUCTIONS
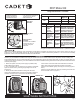
REMOVE SCREWS REMOVE GRILL
1/16”
Insulated sleeve
Reattach
the motor
wires
Wires and
insulated
sleeve
leent
leent
arer
tr
stud les
aller
tr
stud les
For more effective and safer operation and to prolong the life of
the heater, read the Owner’s Guide and follow the maintenance
instructions. Failure to properly maintain the heater will void any
warranty and may cause the heater to function improperly. War-
ranties are non transferable and apply to original consumer only.
Warranty terms are set out below.
LIMITED 90-DAY WARRANTY: Cadet will repair or replace any
Cadet part found to be defective within 90 days after the date of
purchase. This warranty only applies to parts purchased or in-
stalled after the expiration of any other applicable warranty period.
These warranties do not apply:
1. Damage occurs to the product through improper installation or
incorrect supply voltage;
2. Damage occurs to the product through improper maintenance,
misuse, abuse, accident, or alteration;
3. The product is serviced by anyone other than Cadet;
4. Refurbished products;
5. If the date of manufacture of the product cannot be determined;
6. If the product is damaged during shipping through no fault of
Cadet.
7. CADET’S WARRANTY IS LIMITED TO REPAIR OR REPLACE-
MENT AS SET OUT HEREIN. CADET SHALL NOT BE LIABLE
FOR DAMAGES SUCH AS PROPERTY DAMAGE OR FOR CON-
SEQUENTIAL DAMAGES AND/OR INCIDENTAL EXPENSES
RESULTING FROM BREACH OF THESE WRITTEN WARRAN-
TIES OR ANY EXPRESS OR IMPLIED WARRANTY.
8. IN THE EVENT CADET ELECTS TO REPLACE ANY PART OF
YOUR CADET PRODUCT, THE REPLACEMENT PARTS ARE
SUBJECT TO THE SAME WARRANTIES AS THE PRODUCT.
THE INSTALLATION OF REPLACEMENT PARTS DOES NOT
MODIFY OR EXTEND THE UNDERLYING WARRANTIES. RE-
PLACEMENT OR REPAIR OF ANY CADET PRODUCT OR PART
DOES NOT CREATE ANY NEW WARRANTIES.
9. These warranties give you specic legal rights, and you may
also have other rights which vary from state to state. Cadet nei-
ther assumes, nor authorizes anyone to assume for it, any other
obligation or liability in connection with its products other than as
set out herein.
If you believe your Cadet product is defective, please contact
Cadet Manufacturing Co. at 360-693-2505, during the warranty
period, for instructions on how to have the repair or replacement
processed. Warranty claims made after the warranty period has
expired will be denied. Products returned without authorization will
be refused.
Parts and Service
Visit http://www.cadetheat.com/parts_service.php for information
on where to obtain parts and service.
Reduce-Reuse-Recycle
This product is made primarily of recyclable materials. You
can reduce your carbon footprint by recycling this product at
the end of its useful life. Contact your local recycling support
center for further recycling instructions.
7. Remove motor from mounting bracket by taking out two
screws (top) and two nuts (bottom). Some models may only have
two nuts.
8. Feed the new motor wires through the insulated sleeve
provided in the kit, or reuse existing sleeve.
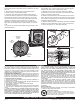
9. Insert new motor with wires and insulated sleeve pointing
up. Because heater is upside down, wires and insulated sleeve
should point to the bottom of the heater (Figure 4). The studs
will come through one of the two sets of the slotted outer holes,
depending on the size of the motor. Be sure the studs are
centered in the slotted holes and secure the new motor studs
tightly with nuts provided (motor kit part #410209), or reuse old
ones.
10. Feed the new motor lead wires back through the hole to the
terminal block area.
11. Reattach fan blade by placing it on the motor shaft leaving
approximately 1⁄16” at end of shaft (Figure 5). Securely tighten
set-screw with Allen wrench at at of motor shaft.
12. Manually turn fan to be sure it spins freely. If it’s rubbing,
the studs are not secured in the center of the slotted holes. Re-
position, if necessary. (Refer to #9).
13. Reattach the motor wires to the terminal block and On/Auto
switch. Be sure each connection is tight (Figure 6). Close service
door and secure single large screw on side of door panel. Return
the heater to its initial position.
14. Reattach diffuser grill with seam facing downward. Installation
is easier by loosely setting all 4 screws or nuts, then tightening.
15. Plug in unit and turn on. Test heater operation.
Page 2
©2013 Cadet Printed in USA Rev 12/13 #706597
Figure 5
Figure 6
Figure 4
Wires and
insulated
sleeve
Element
Set
Large
motor stud
holes
Small
motor stud
holes
Insulated Sleeve
Reattach
the motor
wires