
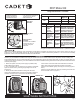
Cut Sheet

www.cadetheat.com Tel: 360-693-2505 PO Box 1675 Vancouver, WA 98668-1675
SAVE THESE INSTRUCTIONS
RCP Motor Kit
Replacement Guide
Installation
REMOVE SCREWS
REMOVE R
REMOVE SCREWS
REMOVE R
REMOVE SCREWS REMOVE GRILL
1/16”
TOOLS REQUIRED:
• Phillips Screwdriver
• Straight Screwdriver
• Needle Nose Pliers
• 1/4” and 11/32” Nut Drive or
small Crescent Wrench
• Allen Wrench set
RCP Models
Volts Model Numbers
Watts
High/Low
Amps
240
RCP402S 4000/2667 16.7/11.1
RCP502S 5000/3333 20.8/13.9
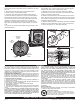
This guide is intended for licensed electricians or qualied technicians
1. Disconnect power cord from power supply. If possible, keep
heater attached to its stand.
2. Turn unit upside down so service door on bottom is accessible.
Open the service door by removing single large screw on the
side of door.
3. Identify the two motor lead wires coming from the motor
through an insulated sleeve. One wire is connected to the termi-
nal block. The other wire is connected to the On/Auto switch.
4. Disconnect motor lead wires at terminal block and On/Auto
switch while noting exact placement for later reconnection.
5. Remove front diffuser grill by removing four screws. (Figures 1
and 2).
6. Remove the fan blade from motor by loosening set-screw with
the correct Allen wrench. (Figure 3).
Motor Only Part
#051408
Motor
Only Part
#051424
WARNING
When using electrical appliances, basic precautions should always be followed to reduce the risk of re, electric shock, and injury to
persons. If you are uncomfortable working with electrical appliances, unable to follow these guidelines, or do not have the necessary
equipment; consult a licensed electrician. All steps must be followed.
Motor Kit Part
#410209
Includes new insulated
sleeve and nuts, as
well as motor part
#051408.
NOTE: If you purchased the individual motor only part numbers 051424 or 051408, retain all your old parts for reuse, including nuts
and insulated sleeves, until you are nished with your motor replacement. Now is the perfect opportunity to clean your heater. See your
original product Owner’s Guide or go to www.cadetheat.com and nd detailed cleaning instructions under Specs and Downloads for the
Hot One product page.
Part Includes Use On Notes
051424 small motor
only; may
require
periodic
lubrication
All
RCP402S
or
RCP502S
models
Standard on all
RCP402S models; also
standard on RCP502S
models manufactured
from 3/08 to present.
051408 large
motor only,
enclosed,
permanently
sealed
All
RCP502S
or
RCP402S
models
Standard on all
RCP502S models man-
ufactured until 2/08; can
also replace a #051424
motor on either model.
410209 051408
motor, new
insulated
sleeve and
nuts
All
RCP502S
or
RCP402S
models
051408 motor standard
on all RCP502S mod-
els manufactured until
2/08; can also replace a
#051424 motor on either
model.
Page 1
Figure 1 Figure 2 Figure 3
Remove Screws Remove Grill