
User Guide

Zooming and Panning in Schematics
71
Automatic Panning
If Auto Pan is enabled, the pointer turns to a solid black
arrow when you move it to the edge of the window. If you
leave the arrow at the edge of the window for a few
moments, the view pans in the direction of the arrow. You
can pan up, down, left, and right using this method.
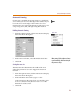
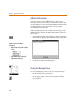
Enabling Automatic Panning
1 From the Options menu, select Pan & Zoom to display
the Pan & Zoom dialog box.
2 In the Auto Pan frame, select the Enable check box.
3 Click OK.
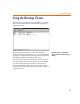
Setting hot zone size
The Hot Zone Size determines the width of the zone
where the pointer has to rest to trigger the Auto Pan
function.
1 From the Options menu, click Pan & Zoom to display
the Pan & Zoom dialog box.
2 In the Hot Zone Size text box, type a value.
Values must be in the range from 1 to 10. If the value
is set to 1 (default value), the hot zone is 1% of the
dimensions of the screen.
3 Click OK.
Options Menu
When panning, click the right mouse button
to pan immediately, rather than waiting for
the pan time to elapse.