
User Guide


Chapter 1 Getting Started
10
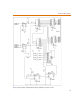
3 Place the pointer in the approximate position for the
placement of R3 and click to place the part.
4 Press M three times to place three more resistors
above the first.
Placing resistors R7 through R10
1 From the Get Recent Part list box on the toolbar, select
R.
2 Press C+R to rotate the resistor before placing it.
3 Place four resistors in the approximate locations of R7,
R8, R9, and R10.
4 Right-click to stop placing resistors.
Placing the remaining parts on the schematic
1 Click the Get New Part button.
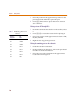
2 In the Part Browser dialog box, select each part listed
in Table 1 from the Part list box.
3 Place the part on the schematic in the approximate
location shown in Figure 2.
T
a
bl
e 1 Remaining Parts to be
Placed
Reference
Designator
Part
Name
C1
U1
C
A4N25
U2 A4N25
U3 74164
U4 74164
U5 74174
U6 74174
U7 7485