
User Guide

Chapter 6 Creating and Editing Symbols
192
Changing the type of a placed pin
1 Select the pin and from the Edit menu, select Change.
2 In the Type list box, select a pin type.
3 Click OK.
The change is only in effect for the selected pin.
Changing the pin name
As you placed pins, default names were assigned.
To change the name of a pin, do the following:
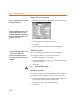
1 Double-click the pin or pin name.
2 In the Change Pin dialog box, type the pin name in the
Pin Name text box.
3 Click OK.
Note Pin names MUST be unique.
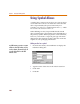
Changing the pin number
As you placed pins, default pin numbers were assigned.
To change the pin number for a pin, do the following:
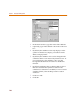
1 Double-click the pin or pin number of the displayed
pin to display the Change Pin dialog box.
2 In the Pin text box, type the pin number.
3 Click OK.
You can a
l
so
d
ou
bl
e-c
l
ic
k
t
h
e pin to
d
isp
l
ay
the Change Pin dialog box.
Th
e F
l
oat= an
d
Mo
d
e
l
e
d
Pin
b
oxes in t
h
e
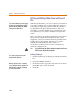
Change Pin dialog are only relevant for
symbols that are going to be simulated with
PSpice. For additional information, refer to
your PSpice user’s guide.
T
o create pin names wit
h
over
b
ars, use t
h
e
‘\’ character, for example, \CLK\
Use the Pin List selection from the Part
menu to view and edit the list of all pins for
the symbol.