
User Guide


Using Wires and Buses
107
Drawing a bus
1 Click the Draw Bus button to change the pointer to a
pencil shape.
2 Click to start the bus.
3 Click at each vertex of the bus.
4 Right-click to end the bus and change the pencil back
to a pointer.
Labeling a bus
1 Double-click the bus segment to display the Set
Attribute Value dialog box (see 4-105
).
2 Type the label in the LABEL text box.
3 Click OK.
Editing a bus label
1 Double-click the bus (or the label) to display the Set
Attribute Value dialog box (see 4-105
) and the existing
label in the LABEL text box.
2 Edit the existing label or delete it and type in a new
label.
Connecting wires to buses
1 Draw a wire so that it ends on the bus.
2 Label the wire with one of the signals on the bus. For
example, you can label the wire DB[12] or DB12 if the
bus is labeled DB[0:16].
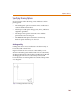
Splitting buses
Connecting a bus segment to the middle of another bus
segment creates a junction. The bus segments become part
of the same bus unless labeled differently. This allows
sub-buses to be taken off a main bus, for example A[0-7]
from A[0-31].
1 Draw a bus segment and end it on the main bus.