
User Guide


Chapter 4 Creating and Editing Designs
100
Replacing Parts
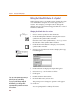
A single part on a schematic may be replaced easily. In
addition, all parts of a given type on a page, or all pages of
a multi-page design may be replaced. Instead of having to
delete one part, find another in a library, and place the
new part, you can replace the old with the new in one
operation.
Replacing a single part
1 Select the part to be replaced.
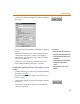
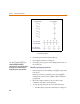
2 From the Edit menu, select Replace to display the
Replace Part dialog box.
Note that Target Part is unavailable because you have
already selected a part and don’t need to specify one
in the dialog box.
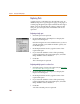
3 In the Replacement text box, type the name of the
replacement part.
4 If you want the attribute values of the part being
replaced applied to the replacement parts, select the
Keep Attribute Values check box.
5 Click OK.
The selected part is replaced.
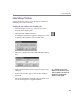
Replacing multiple parts in a selected set
1 Select the group of parts to be replaced. (See Selecting
more than one object on page 4-116.)
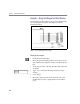
2 From the Edit menu, select Replace to display the
Replace Part dialog box.
3 In the Replacement text box, type the name of the
replacement parts.
4 If you want the attribute values of the parts being
replaced applied to the replacement parts, select the
Keep Attribute Values check box.
5 Click OK.
All of the selected parts are replaced.