
User Guide


Placing and Editing Parts
99
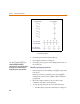
Drawing the first wire segment connecting the part to the bus
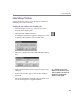
1 Click the Draw Wire button.
2 Move the pencil-shaped pointer to a point on the bus
where wire segment A[0] attaches to the bus. Click to
start drawing the wire.
3 Move to pin D1 on U1 and double-click.
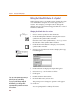
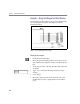
Using Auto-Repeat to create the remaining wire segments
1 Enable Auto-Repeat (see Automatically repeating part
placements on page 4-95).
2 Set the horizontal offset to 00.00 and the vertical offset
to 00.10.
3 Press M seven times to draw seven additional wire
segments.
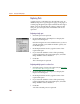
Using Auto Naming to quickly label the wire segments
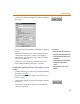
1 From the Options menu, select Auto Naming to
display the Auto Naming dialog box.
2 In the Wire/Port Labels frame, select the Enable
Auto-Increment check box.
3 Type A[0] in the Label Template text box.
4 Click OK.
5 Select the first wire to be labeled.
6 From the Edit menu, select Label to label the wire.
7 To label each of the remaining wire segments:
a Select the wire.
b Press M.
S
h
ortcut: press C+E