
User Guide

Chapter 4 Creating and Editing Designs
90
Adding Attributes
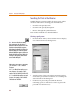
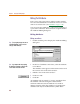
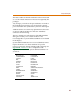
Adding a new attribute
1 Double-click the part to display the Attribute Editing
dialog box (see 4-88
).
2 Double-click in the Name text box and type the new
attribute name.
3 Press F and type the new attribute value in the
Value text box.
4 Click Save Attr.
5 Click OK.
The new attribute and its value apply only to the part
instance you are editing on the current schematic. The
attribute and value are saved only with the schematic;
they are not saved in the symbol library.
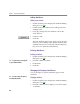
Deleting Attributes
Deleting an attribute
1 Double-click the part to display the Attribute Editing
dialog box (see 4-88
).
2 Select the attribute to delete.
3 Click Delete.
4 Click OK.
Changing the Display of Attributes
You can change how specific attributes appear on the
schematic.
Displaying attributes
1 Double-click the part to display the Attribute Editing
dialog box (see 4-88
).
2 Select the attribute whose display you want to enable
(or disable).
Note You cannot
d
e
l
ete non-c
h
angea
bl
e
or system-defined attributes.
Note You cannot c
h
ange t
h
e
d
isp
l
ay o
f
non-changeable attributes.