
User Guide

Chapter 4 Creating and Editing Designs
84
7 Move the outline of the selected symbol to any
location on the schematic and click to place the part.
8 Right-click to stop placing parts.
Browsing symbol libraries to select a part
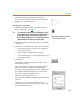
1 Click the Get New Part button to display the Part
Browser dialog box (see 4-82
).
Note One of two Part Browser dialog boxes may appear: the Part
Browser Advanced and the Part Browser Basic. If the Part Browser
Basic dialog box appears, click Advanced to display the Part
Browser Advanced dialog box. If the Part Browser Advanced dialog
box appears, click Basic to display the Part Browser Basic dialog
box. The steps in finding a part by browsing symbol libraries are the
same with either dialog box.
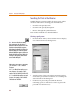
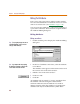
2 Click Libraries to display the Library Browser dialog
box (see 3-45
).
Use the Library Browser dialog box to select a library
and view a list of parts contained in each library.
When you select a part, the part name appears in the
Part Name text box in the Part Browser dialog box and
the part is selected for placing.
3 Click OK.
4 Click Place to place the part (with the browser
remaining open) or click Place & Close (to place the
part and close the browser).
5 Move the outline of the selected symbol to any
location on the schematic and click to place the part.
6 Right-click to stop placing parts.
Note Appendix E, Symbol
Libraries, contains a list of symbol
libraries supplied with PSpice Schematics
and device types.