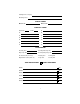
Installing/Service Company Monitoring Center SPECIAL CODES Master Code Duress Code AUXILIARY CODES "Quick Arm" " Chime" 08 02 09 03 10 04 11 05 12 06 13 07 14 SYSTEM NOTES Exit Delay Time Secondary Exit Delay Time Entry Delay Time Secondary Entry Delay Time Fire Alarm Sound (check one) Steady Siren Pulsing Bell Burglar Alarm Sound (check one) Yelp Siren Steady Bell ZONE DESCRIPTIONS 8 CHECK FIRE ZONES ZONE 1 Fire ZONE 2 Fire ZONE 3 Fire ZONE 4 Fire ZONE 5 Fire
THIS MANUAL IS FURNISHED TO HELP YOU UNDERSTAND YOUR SECURITY SYSTEM AND BECOME PROFICIENT IN ITS OPERATION. ALL USERS OF YOUR SECURITY SYSTEM SHOULD READ AND FOLLOW THE INSTRUCTIONS AND PRECAUTIONS IN THIS BOOKLET. FAILURE TO DO SO COULD RESULT IN THE SECURITY SYSTEM NOT WORKING PROPERLY. THIS BOOKLET SHOULD BE KEPT IN AN ACCESSIBLE LOCATION FOR THE LIFE OF THE SECURITY SYSTEM.
HOW TO ARM YOUR SECURITY SYSTEM To Arm the security system, close all of the protected doors and windows. The green "READY" light on the keypad control will be illuminated when all of the protected zones and sensors are secure. If any of the zones are bypassed, a sensor in that zone can be violated without affecting the "READY" light. The security system will not arm if the "READY" light is not illuminated unless "FORCE ARMING" has been enabled (see "FORCE ARMING" page 4).
K AUTOMATIC BYPASS OPTION If checked, the "AUTOMATIC BYPASS" option has been selected by your installing company. With this feature enabled, all interior zones will automatically bypass if you "ARM" your security system and do not leave through a designated entry/exit door. The "AUTOMATIC BYPASS" will occur at the end of the exit delay time. At this time, all bypassed "ZONE" lights will become illuminated.
THE CHIME FEATURE If checked, your security system will operate in the "CHIME" mode, allowing the monitoring of pre-designated zones while the security system is not armed. While in the "CHIME" mode, the opening of any of these zones will produce a 1 second beep from the keypad control. To activate this feature, press the "CHIME" digit which is the first digit of the Master Code. Five seconds after pressing the "CHIME" digit, a one second tone will occur indicating that this feature has been activated.
DURESS CODE If checked, your security system has a "DURESS CODE" option. If so, this code may be programmed to send a special message to the central monitoring station if you are forced to arm or disarm your security system against your will. Check with your Installing/Servicing company to see if this option has been enabled for your system. FIRE ZONE If checked, your system has zones designated as "FIRE" zones.
RESETTING YOUR SECURITY CONTROL CENTER In the event of a system malfunction in the Security Control Center, press the [#] (reset) key on the keypad control. This should reset the code sequence and restore normal operation. If the problem persists, call the service number located on page 1 of this booklet for service. AUDIBLE ALARM SOUNDS FIRE: Steady siren, pulsing bell (see page 1) or beeping keypad. INTRUSION & PANIC: Yelp siren, steady bell (see page 1) and beeping keypad.
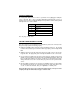
SERVICE CONDITION The “Ready” LED will flash in the event of a system fault. Press [U]-[2]-[2] to identify the source of the fault. One or more zone lights will illuminate indicating what service(s) is required. Call your service provider immediately for these problems. Below is a listing of what each light means in a service condition. Light Service Condition 1 Telephone Line Fault 2 Bell Fault 3 Fuse 4 Fail to Communicate 5 Bell Overcurrent Press any key to exit this mode.
EMERGENCY EVACUATION PLANS An emergency evacuation plan should be established for an actual fire alarm condition. For example, the following steps are recommended by the National Fire Protection Association and can be used as a guide in establishing an evacuation plan for your building. Draw up a floor plan of your home. Show windows, doors, stairs, and rooftops that can be used for escape. Indicate each occupant's escape routes. Always keep these routes free from obstruction.
8600E USER’S MANUAL 8600EUE99 REV E (04-28-99)