
Switch User Manual


Configuring the Trap Table
3-2 Launching the Trap Table
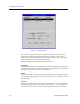
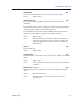
Figure 3-1. The Trap Table
The list box at the top of the window displays the trap table entries that have
already been conÞgured; the Þelds and buttons in the lower portion of the
window allow you to add new entries and modify or delete existing ones. Each
device can support up to 16 entries in its trap table.
Each trap table entry contains the following parameters:
IP Address
Indicates the IP address of the management workstation that will receive traps. Be
sure this is a management workstation which has some facility for accepting and
displaying traps, or traps sent there will be ignored.
Status
Each trap table entry can be either enabled or disabled; when enabled, the entry is
active and the designated traps will be sent when they occur. No traps are sent to
disabled entries.
Severity
Each trap issued by the FRX or SmartSwitch 1800 contains a severity designation,
indicating the importance of the event it is announcing; you can use these levels
to Þlter the traps you wish to send to each designated workstation. Only those