
Switch User Manual
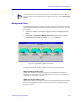

Frame Relay Status and Configuration
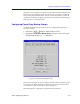
5-14 Frame Relay Backup Groups
RLP
Indicates the RLP where the physical port on which the backup DLCI is being
conÞgured resides. For the FRX4000 and SmartSwitch 1800 this would always be
0. For the FRX6000 this could be RLP 0 - 7.
Port
Indicates the physical port on which the backup DLCI is being conÞgured.
DLCI
This is the DLCI number of the backup being conÞgured. The DLCI must already
have been created either in console management (refer to your FRX or
SmartSwitch 1800 hardware documentation) or in the Frame Relay DLCI Rate
ConÞguration window (see DLCI Rate ConÞguration, page 5-8).
Group
DeÞnes the frame relay backup group the backup DLCI belongs to. A backup
group is then assigned to one or more primary DLCIs.
Each backup group can contain up to ten backup DLCIs. A DLCI cannot be
assigned to more than one backup group, nor can it be assigned to a backup
group if it is a primary DLCI (one that will be backed up).
Wait Timer
Indicates the time (in seconds) after a primary DLCI failure that the initiating
node will wait for this backup DLCI to become active before checking the next
backup DLCI. If the backup DLCI does not become active before the timer
expires, the node will search the backup group for the next available backup.
Protocol Enabled
If Yes is selected, the backup protocol on the speciÞed DLCI is enabled. This Þeld
should be set to Yes if, and only if, the remote node is a FRX or SmartSwitch 1800
with the backup protocol enabled on the remote DLCI connected to this backup
group entry.
The remote node must be the same one to which the primary DLCI was
connected, and the remote nodeÕs backup DLCI must be on the same RLP as its
primary DLCI. Also, the primary DLCI in the initiating node must have the
remote nodeÕs primary RLP, port, and DLCI conÞgured in its DLCI parameters.
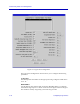
Changing Backup Group Values
To edit the values assigned to each backup DLCI:
1. If you wish to modify an existing entry, be sure that entry is highlighted in the
list box portion of the window.
2. Enter and/or edit the values displayed in the text boxes, as desired.
(Remember, some values which are settable from this window must mirror
values received from your service provider or configured elsewhere; be sure
these values match as necessary.)