
User`s guide


Chapter 4: Local Management
Page 4-18 IRM3 User’s Guide
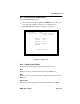
4. Press RETURN until the appropriate selection appears. The Access
field is a toggle field that alternately displays RO, RW, SU, and NA
when you press RETURN.
5. Using the arrow keys highlight the TRAPS field.
6. Press RETURN until the appropriate selection appears. The TRAPS
field is a toggle field that alternately displays YES and NO when you
press RETURN. YES indicates alarms from the IRM3 will be sent to
the workstation. NO indicates alarms will not be sent from the IRM3
to the workstation.
7. Using the arrow keys, highlight the appropriate Trap IP address field.
8. Enter the IP address of the Network Management Station into the field
in dotted quad notation (XXX.XXX.XXX.XXX, where XXX is a
value between 0 and 255). The valid range is from 0.0.0.1 to
255.255.255.255. Press RETURN.
9. Using the arrow keys, highlight the SAVE command at the bottom of
the screen.
10. Press RETURN. You return to the IRM3 Main screen and the message
“Modified screen Information Has Been Saved!” appears on the
screen.
Alarms are now sent to the designated management workstations from the
IRM3, and the access modes will be implemented.
If a Community Name is given Superuser Access to the IRM3, the
Community Name also acts as a password to Local Management.
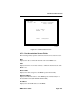
4.6 THE SETUP SCREEN
Using the IRM3 Setup option, you can set the IP address of the IRM3. In
addition, you can set the current date and time for your IRM3. The
following sections describe the Setup screen. Each field is described, and
instructions are given to alter applicable fields.
Once they are set, these options are saved in the battery backup memory
when you shut down your IRM3.