
User`s guide


Chapter 4: VLAN Configuration
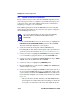
4-18 Port Based VLAN User’s Guide
4.6 QUICK VLAN WALKTHROUGH
The procedures below provide a short tutorial walkthrough that presents
each of the steps necessary to configure a new VLAN and assign a port to
it. You may wish to follow this walkthrough from start to finish before
attempting to configure your own VLANs.
This walkthrough begins at the VLAN Main Menu screen for a 6C105
chassis. Follow the instructions in your device user’s guide to navigate to
this Local Management screen.
1. On the VLAN Main Menu screen, use the arrow keys to highlight the
DEVICE/VLAN CONFIGURATION menu item. Press ENTER.
The Device/VLAN Configuration screen displays.
2. Verify the current VLAN Operation Mode (SECURE) and
Forwarding Mode (NO). If these fields display values other than those
given here, follow the instructions in Section 4.3.6 and Section 4.3.7.
3. Use the arrow keys to highlight the VLAN ID field. Assign a number
to a new VLAN by typing the number “2” in the VLAN ID field.
4. Use the arrow keys to highlight the VLAN Name field. Type “TEST
VLAN” in the VLAN Name field. Press ENTER.
5. Use the arrow keys to highlight the [ADD/DEL] field.
6. Press the SPACE bar to toggle the field to [ADD]. Press ENTER. The
VLAN is added to the list.
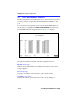
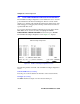
7. Use the arrow keys to highlight the SAVE command at the bottom of
the screen. Press ENTER. The message “SAVED OK” displays. The
screen refreshes and VLAN 2, the TEST VLAN has been added to the
Device/VLAN Configuration screen. The screen should now look like
Figure 4-6.
• This new VLAN is currently disabled, as the DISABLED field to
the far right shows. When all the rules and settings for the VLAN
are in place, we will return to this screen and enable the VLAN.
NOTE
The screens displayed by your devices may be marginally
different from those shown in the illustrations for this
walkthrough.