Deluxe Component Video/Digital Audio 6 In / 2 Out Matrix Switch Connect up to six audio and video components to two televisions or monitors Model: 40697
Table of Contents Functions ………………………………………………………………………….1 Features……………………………………………………………………………2 Connecting Devices…….………………………………………………………2-3 Operating the Switch Controlling the Switch from the IR Remote…………………………….4 Controlling the Switch from the Front Panel………….………………..5 Factory Default Settings………………………………………………………….6 Specifications……………………………………………………………………...
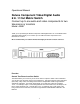
Operational Manual Deluxe Component Video/Digital Audio 6 In / 2 Out Matrix Switch Connect up to six audio and video components to two televisions or monitors Model: 40697 Thank you for purchasing the Deluxe Component Video/Digital Audio 6 In / 2 Out Matrix Switch. This Matrix Switch allows you to connect up to six audio and video components to two televisions or monitors. We recommend that you read this manual thoroughly and retain for future reference.
Features: • Two Component Video / TOSLINK Outputs Allow you to connect up to six sources to any two devices such as a TV or an AV receiver • Component Video Inputs Support HDTV quality video • TOSLINK Optical Inputs Let you connect TOSLINK digital optical cable for multi-speaker theater sound tracks.
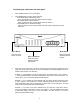
1. Connect each of the component video outputs from your devices (DVD player, HD cable/satellite receiver, video game player, etc.) to a set of Inputs (1-5) Y, Pb and Pr jacks on the back of the switch or Input (6) Y, Pb, and Pr jacks on the front of switch. 2. Connect your device’s optical outputs to a set of Optical Input (1-5) jacks on the back of the switch or Input 6 Optical jack on the front of the switch.
Operating the Switch: Controlling the switch from the IR remote control 1. Press POWER ON to turn on the matrix switch. 2. Press 1 – 6 on either the green or red panels to route your preferred playback device to output 1 or output 2. Green panel represents output 1. Red panel represents output 2. Example 1 – You would like to route your DVD player on Input 3 to output 1. Press 3 on the green panel. The LED of Input 3 on the front panel will be illuminated green.
Controlling the switch from the front panel 1. Press POWER button to turn on the switch. 2. Press MODE button to select output mode first. - If the MODE switch is illuminated green, Input 1-6 selected in the next step will be routed to Output 1. - If the MODE switch is illuminated red, Input 1-6 selected in the next step will be routed to Output 2. - If the MODE switch is illuminated orange, Input 1-6 selected in the next step will be routed to Output 1 and Output 2 at the same time.
Factory Default Settings: The 40697 will retain input/output settings when powered off by the remote control or the switch’s front face power button. Unplugging the supplied power adapter from the switch, will automatically restore the factory default setting. The default factory setting routes Input 1 to Output 1 and Output 2 simultaneously. Specifications: Power Requirement: DC 12V 500mA (Using the Supplied AC Adapter) Power consumption: 6 Watts Sampling frequency: 44.1K Hz Optical Output Level: 6uW Min.
Impact Acoustics™ One Year Warranty At Impact Acoustics, we want you to be totally confident in your purchase. That is why we offer a one year warranty on this device. If you experience problems due to workmanship or material defect for the duration of this warranty, we will repair or replace this device. To request a Return Merchandise Authorization (RMA) number, contact customer service at 877-AV-EXPERT or www.impactacoustics.com.