
Instruction manual


4
GETTING STARTED
WITH YOUR
PROMET 3
CONTROLS AND
WHAT THEY DO
On/Off Tune
Sensitivity
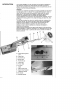
After assembly and ballery insertion the PROMET 3 is now ready for
operation. The PROMET 3
is
extremely simple
to
operate, and
is
programmed and designed
in
such a way that the operator is not required
to
adjust discriminate or ground exclude levels.
All that
is
required is
to
turn the detector
ON
at the ON/OFF TUNE control
and tune the detector
to
threshold, as described below, and then programme
the mode of operations. Here's how:-
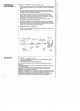
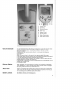
Tuning
Turn
the detector ON
at
the ON/OFF TUNE control which works
in
conjunction
with the RETUNE bullon on the meter console. Hold the RETUNE
STATUS
button down, and rotate the
Tune
control clockwise until the meter
reaches the central
Tune
position, and the sound is just beginning
to
break
through. Set this carefully and precisely and then release the memory
RETUNE
STATUS
push bullon. If the Tuning level alters or wanders off tune,
do not adjust the TUNE control. Simply operate the RETUNE
STATUS
push
bullon which will automatically re-tune the detector
to
the original selected level.
Programme
Set
To
begin detecting, first tune, then set the controls as follows:
Sensitivity - 0
Ground Exclude -
G2
or Beach
Auto
Tune
- ON
Audio Discrim. - ON
Meter Discrim. -
ON
Even greater depth will
be
achieved
by
leaving the Audio Discriminate off
as
this
control tends
to
draw extra current when a good object
is
located,
as
explained
on
page
2.
The RETUNE
STATUS
bullon will indicate which modes are engaged and
operational. The AUTO TUNE button can
be
turned off once the machine has
been operated for
30
minutes (except on the beach).
The detector is now excluding the ground
at
a pre-set level
on
one channel
and discriminating
at
a programmed level on the other channel.
All metal objects will
be
indicated
by
an increase in loudness but rejected
objects will cause the meter
to
fall
to
the left and the tone frequency
to
decrease. Accepted targets will conversely cause the meter
to
rise
to
the right
or remain stationary and the tone frequency
to
increase.
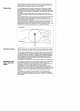
Simply sweep the detector
in
an
arc, ensuring the head
is
level and as close
to
the ground as possible. Advance half a head length
at
a time, and ensure
the tuning level is correctly
set
by
raising the head
an
inch or
two,
depressing
the RETUNE
STATUS
push bUllon, and then lower the head and continue.
For
a more detailed description of the CONTROLS AND WHAT THEY
DO,
read on, but if you follow the programmed method, outlined above, you
cannot go far wrong.
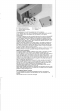
The controls are divided into two areas. Those on the Main Control
Box
of
which there are three controls and those
on
the Meter Console where there
are five function switches (four with associated lights) located below the
meter.
Meter Console Functions AUTO TUNE, METER DISCRIMINATE and AUDIO
DISCRIMINATE are pressed
to
engage function, press again
to
disengage.
RETUNE
STATUS
and BATIERY CHECK are momentary switches. Hold
down
to
engage function, release
to
disengage.
See
Tuning above.
The SENSITIVITY CONTROL regulates the sensitivity of the detector
to
drift,
instability etc., as well
as
to
metal objects. The recommended starting point is
oand highlighted
in
red.
Increasing the Sensitivity
by
tuning this control into the + sector the detector
will be more prone
to
drift, erratic signals, ground interfaces,
etc.
Where there
is no ground effect or outside interference the SENSITIVITY control can
be
operated
at
higher levels.
But when the signal becomes unsteady or erratic, the Sensitivity level should
be
reduced
to
obtain a
clear,
steady tuning threshold. Only when the tuning
is
constant
and steady will the detector operate
at
the best optimum depth penetration.