[;)ffi@ZJ[3L1~ OPERATING INSTRUCfIONS
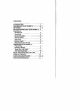
CONTENTS: 1 INTRODUCTION 2 ASSEMBLING YOUR PROMET 3 2·3 BATTERIES GETTING STARTED WITH YOUR PROMET 3 4 CONTROLS: On/Off Tune 4 Sensitivity 4 Ground Exclude 5 Retune Status 5 Auto Tune 5 Battery Check 5 Meter/Audio Discriminate 6 OPERATING YOUR PROMET 3: Pinpointing 7 7 Detection Range Target Size and Depth 7 The Right Approach 8 METAL DETECTING AND THE LAW 9 10 CODE OF CONDUCT 10 • 11 CARE AND MAINTENANCE 11 FURTHER INFORMATION
INTRODUCTION The C-Scope PROMET 3 is the culmination of many years of research by both electronic engineers and metal detector enthusiasts to produce a detector with high performance, that both a novice or experienced user can harness to the full, simply and effectively. Important. To protect your investment complete the enclosed guarantee card and return the reply paid portion to C-Scope. This is particularly important in order to obtain the free second year parts guarantee.
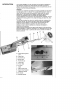
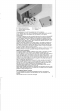
ASSEMBLING YOUR PROMET 3 Assembly of the PROMET 3 requires no special tools. 1. Remove the various parts from the box (the lower stem is already inserted into the middle stem) and lay on a clear surface as shown in the diagram below. 2. Unscrew the locking nut and remove the screw from the search head. Insert the lower stem between the lugs of the search head so the holes in the stem, friction boot and lugs are aligned. 3.
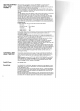
R O. P. a. Battery Compartment Penlight Battery Holders Battery Leads R. S. , S Battery Cover Fastener The loudspeaker is by far the greatest drain on the batteries. If HP7 batteries are to be used it is necessary to load these into the penlight battery holders which are supplied with the detector in the battery compartment. First undo the battery cover by turning the fastener with a small coin through 90 0 . This frees the fastener and releases the cover, which can then be lifted off.
GETTING STARTED WITH YOUR PROMET 3 After assembly and ballery insertion the PROMET 3 is now ready for operation. The PROMET 3 is extremely simple to operate, and is programmed and designed in such a way that the operator is not required to adjust discriminate or ground exclude levels. All that is required is to turn the detector ON at the ON/OFF TUNE control and tune the detector to threshold, as described below, and then programme the mode of operations.
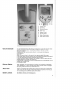
T. On/Off Tune U. Sensitivity V. Ground Exclude W. Auto Tune X. Y. Z. Battery Check Retune Status Meter Discriminate a. Audio Discriminate Ground Exclude The G2 GROUND EXCLUDE selling is designed to cope with even the most severely mineralised sites. This setting is marked in red as it is most frequently needed. However, you may need to select either G1 or G3 under the following circumstances: Select G2 Lower the search head to the ground from approximately 50cm away.
Meter/Audio Discriminate The levels of Discrimination or Rejection are identical in both modes Meter and Audio (Discrimination c;an be defined as the ability to give a different type of signal for ferrous junk or worthless objects than the signal given by a non ferrous object). Both these Discriminate Modes are set at such a level, so that depth penetration to coins etc. is good, and discrimination against most iron and silver foil is achieved.
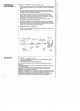
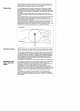
Since the detectors employ a Total Response search head the object can be detected across the full width, back to front, of the search head. Maximum sensitivity occuring down the middle of the search head. Pinpointing (i) The strongest signal will always be received when the object is directly beneath the centre of the head (see X in Diagram 1).
The Importance of the Right Approach Treasure hunting can be a profitable and rewarding hobby, if approached in a patient and diligent manner. Time spent researching to locate a worthwhile site for a search can be time wasted if your search is hasty and erratic. To achieve maximum results it is important then, to decide on your approach to any particular site in advance of the actual search.
It is also important to keep the detector head as close to the ground as possible. ideally, you should "iron" the ground with the search head of the detector, so that you do not lose any detection range. Similarly, if you work slowly and carefully you should be able to distinguish the faint signals as well as the clear-cut signals and further increase your finds. The technique of getting the best out of your detector is not learnt overnight.
CODE OF CONDUCT 1. Do not trespass. Ask permission before venturing on to any private land. 2. Respect the Country Code. Do not leave gates open when crossing fields, and do not damage crops or frighten animals. Do not leave a mess. It is perfectly simple to extract a coin or other small object buried a few inches under the ground without digging a great hole.
The Detector Drifts out of Tune (a) Temperature drift caused by the change in air temperature when a machine is moved from a house or a car into the open. (b) The greater the change in temperature the more the drift, and up to 30 minutes may be needed for the electronic circuitry to acclimatize itself. (c) Sometimes battery drain can cause drift of signal. Replace batteries and this should help to maintain a stable signal.