
Operating instructions
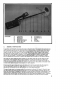


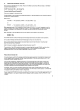
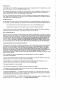

DIAGRAM 1.
A.
Lower
Stem
G.
Knurled
Nut
lil
B.
Middle
Stem
H.
Knurled Nut
(ii)
C.
Upper
Stem
I. Cable
D.
Search Heed Fastener
J.
Din Plug
E.
Search Heed Lugs
K.
Din
Socket
F.
Friction
Boot
A. ASSEMBLY INSTRUCTIONS
To
assemble
the
METADEC
IIconnect the stems
to
the search head. First connect the lower stem
(Al.
which
is
already inserted
into
the middle stem
(Sl.
to
the search head.
Undo
the search head fastener
(D) and then
carefully
position
the
lower stem between the search head lugs IE)
so
that
the
drilled
holes
in
the lugs,
the
friction
boot
(F) and
the
lower
stem
line
up. Insert
the
search head fastener
and tighten
by
turning
the small
nut
until
it
is
tight.
Then
by
holding
the
small
nut
and
turning
the
lever
nut
over
further
tighten
the
fastener.
Do
not
tighten
with
pliers
or
tools
or
the
search head
lugs may be over-stressed.
If
the
search
head
becomes loose
fitting
it
may be necessary
to
obtain
and
fit
a replacement
friction
boot.
These can be obtained free
of
charge
from
the
Ashford
factory.
Next
slide
the
metal middle stem
about
halfway up
the
plastic
lower
stem
so
that
metal
is
at least
15
ems away
from
the
search head.
It
may be necessary
to
loosen
the
knurled
nut
to
adjust
the
stems,
but
it
is
not
necessary
to
detach
the
knurled nut.
At
the
right
point
tighten the knurled
nut
to
fix
the
middle
stem
onto
the
lower
stem. Each knurled
nut
(G. H.I
has
a plastic olive seated inside
it
which
when tightened causes
the
two
pipes
to
fit
tightly
together.
Finally
insert
the
search head and
lower
and middle stem
into
the upper stem IC)
after
loosening
but
not
detaching
the
knurled
nut.
Again
tighten
the
knurled nut at the required height. In
practice
only
this
knurled
nut
will
need
adjusting
for
future
height adjustment.
The search head
output
is a long grey cable
(I)
terminating
in a five
pin
DIN
plug
(J).
Carefully
loop
the cable around the stems ensuring
that
the cable
is
not
too
tight
between the search
head
and the
lower stem. Some slack
is
necessary at this
point
to
enable the search
head
angle
to
be adjusted in
use.
Usually about six loops are
sufficient.
The
01
N plug
has
a guide
to
line
up
with
the
01
N socket
(Kl.
Carefully insert
the
DIN
plug, and when
the
pins are
correctly
aligned and seated
correctly,
rotate
the
DIN
plug
collar
until
it
slides
onto
the
DIN
socket, then tighten
to
lock
the plug
onto
the socket.
3