
User's Manual

CIP-4500 User Manual 15
of phone number (E.164). Therefore, make sure to check them when you subscribing the phone to the IP phone
service network.
NOTE. If you click Prev in the first Internet Phone setting, you will move to Time Server setting menu. If you
click Next you will move to the second Internet Phone setting menu. In the second Internet Phone setting, if
you click Prev, you will move to the first Internet Phone setting, and if you click Next, you will move to Internet
Sharing setting.
NOTE. If you have not subscribed to the Internet phone service, leave the blank empty, and click Next to move to
Internet Sharing setting.
F2. Internet Phone setting (For SIP protocol)
• This menu is used when you register the IP Videophone to the Internet phone service. The menu
consists of three windows. The first one is the menu on which you shall enter the user information,
and the second and the third are the menus on which you shall set up the Internet phone server.
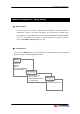
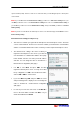
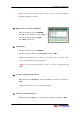
• The Internet Phone setting is the menu on which you
register the IP Videophone to the server or you enter the
user information for communication with the other party.
In this window, enter the user name, password, address
and alias. You can change the value as described in <
Internet Phone Configuration (SIP) (53p)>.
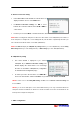
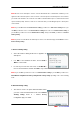
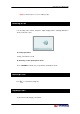
• Use ST to select Next, and press ‘ENT’, and then
register the Internet phone server. You may select either
Proxy or Registrar. Use ST to move between the items,
and use XW or ‘ENT’ to select an item.
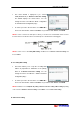
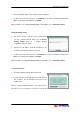
• If you select Next using ST, and press ‘ENT’, the server
and port entering menu is displayed. You can change the
value as described in < Internet Phone Configuration
(SIP) (53p)>.
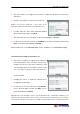
• In order to proceed to the next menu, use ST XW to
move to the menu button, and then click Next, or if you
want to finish Wizard, click Finish.