
User Manual
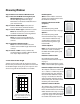
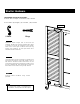
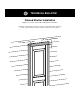


pencil marks
top of shutter
window
window trim
STEP 5
Once the shutter clips are positioned and secured to
the mounting surface, attach shutter by placing shutter
over shutter clips and pressing the shutter ribs on to
each shutter clip. Press shutter firmly against mounting
surface, making sure all six (6) clips are engaged.
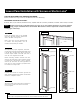
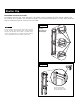
Shutter Clip, Continued
Figure 3
Figure 4
Fasten with bracket up Optional
Next to window Away from window
STEP 2
Hold the shutter where you want it to be attached
on the mounting surface. Mark the center hole of
each shutter clip in each clip. Draw lines vertically
between top and bottom marks. After completing
this step, remove shutter clips from shutter. See
Figure 3.
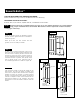
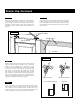
STEP 3
Place the front of the shutter against the mounting
surface and align it next to where it will be installed.
On the vertical lines drawn in Step 2, sketch marks
corresponding to the mounting areas of the shutter.
See Figure 3.
STEP 4
Read complete instructions for Step 4 and examine
Figure 4 before installing shutter clips to mounting
surface. Fasten shutter clips centered on the
vertical line and between the sketch marks drawn
in Step 3. Use one screw next to the window, and
two screws in the shutter clips away from window.
See Figure 4. shutter clips should be free to move
with changes in temperature. Mounting bracket on
shutter clip should be placed in upright position.
Special mounting procedures or techniques may be
required on different mounting surfaces.