
User Manual
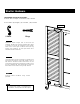
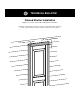


Ferrule
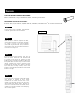
FOR USE ON ANY SURFACE INCLUDING:
Wood, aluminum, vinyl, hardboard, brick, masonry and stone.
REQUIRED FOR INSTALLATION:
Electric drill, 1/4" drill bit, 11/64" drill bit, hammer, Shutter-Loks
®
or screws and ferrule.
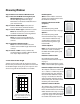
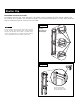
STEP 1
Place shutter next to window, mark desired
location against the wall or window.
STEP 2
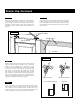
STEP 3
STEP 4
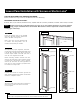
With shutter in location against the wall,
drill through shutter into the wall to depth
of 3-1/4". In brick, the hole diameter
should be no greater than 1/4", and drilled
into mortar joints. Do not attach shutter at
this time. See Figure 1.
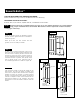
Place Ferrule behind shutter and line up
with the holes drilled for the Shutter-Loks
or screws. Trim ferrule to properly fit gap
between back of shutter and wall to which it is
being attached. Ferrules may not all be same
length. Shutter-Loks used in masonry must
penetrate into the wall to a depth of at least
7/8". Note that if using screws, drill a hole
11/64". Follow shutter installation instructions
based on height.
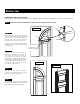
Ensure ferrule is trimmed to desired length
and shutter is parallel to wall. Insert
Shutter-Lok or screw into the hole in the
shutter and through ferrule into the wall.
Tap Shutter-Lok gently with a hammer or
drive in a screw to secure the shutter to the
cladding. To prevent shutter from dimpling,
do not over tighten.
Figure 1