
User Manual
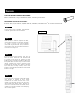


1/4" holes
1/4" holes
Figure 2B
NOTE: Shutters need room to expand/contract, be sure not to over tighten fasteners. To prevent shutters
from warping, proper installation must be followed. Wall anchors will be required for shutters installed
on any type of masonry.
FOR USE ON A VARIETY OF SURFACES INCLUDING:
Wood, aluminum, vinyl, stucco, hardboard, brick or masonry.
REQUIRED FOR INSTALLATION:
Electric drill, 1/4" drill bit (Shutter-Loks), 11/64" drill bit (screws), hammer, Shutter-Loks and/or screws.
Louver/Panel Installation with Screws or Shutter-Loks
®
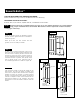
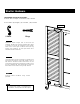
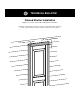
Place the shutter next to the window
and mark desired location against the
wall or window. See Figure 1.
Note: Up to 43", use four Shutter-Loks
or screws. 44" and greater, use six
Shutter-Loks/screws per shutter.
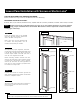
STEP 1
To help ensure proper alignment, mark and
pre-drill holes into the shutter before attaching
it to the wall. Shutter-Loks require 1/4" hole.
Screws require 11/64" hole and 1/4" hole if
over 44". See Figures 2A and 2B.
When installing shutters shorter than 44",
drill four (4) 1/4" holes in the locations shown
in Figure 2A. If the shutter is 44" or greater,
drill six (6) 1/4" holes for Lok application or
four (4) 1/4" holes and two (2) 11/64" holes
for screws. See Figure 2B.
STEP 2
top of shutter
window
Figure 1
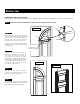
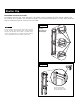
STEP 3
Position the shutter in location against the
wall, and drill through the shutter into the wall
surface to a depth of 3-1/4".
1/4" holes
1/4" holes
11/64" holes
Four Shutter-Lok Application
Figure 2A
Six Screws Application
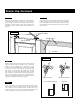
To remove shutters, do not attempt to pull out the Shutter-Loks. Instead, simply
slide a pair of snips behind the shutter to cut the Shutter-Lok off at the shank.
NOTE:
STEP 4
Tap the Shutter-Lok gently with a hammer or
drive in the screw so as not to over drive
or over tighten.